📖 B. INTRODUCTION
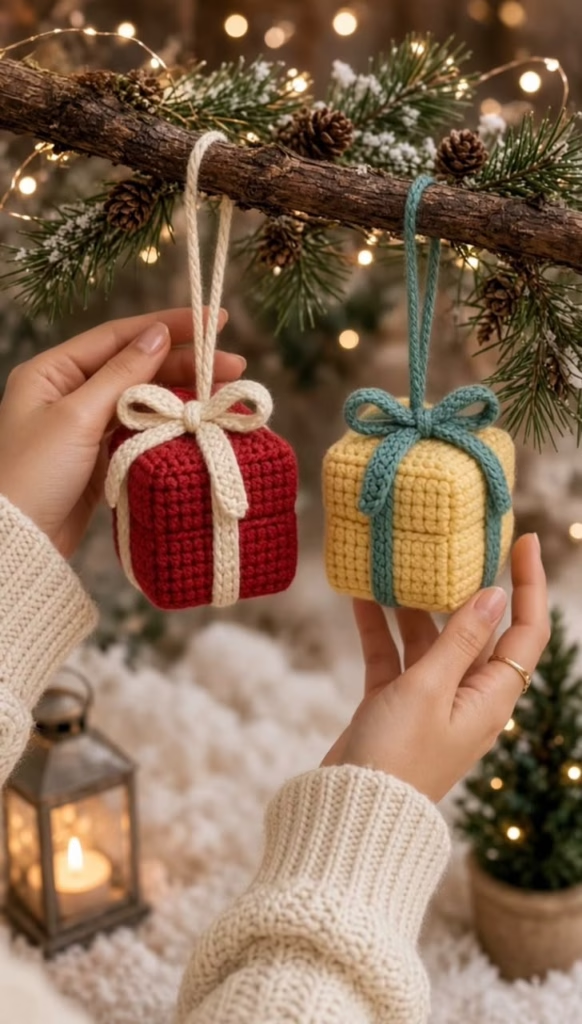
Bring cozy warmth to your holiday tree with the Mini Gift Box Ornament Duo, a charming pair of plush crocheted present ornaments finished with elegant contrasting bows and integrated hanging loops. Designed with clean geometric lines, these neat 3D gift boxes offer a modern rustic aesthetic that fits perfectly into farmhouse, boho, or traditional holiday decor schemes. The set features two colorways: a rich crimson red box paired with an off-white cream ribbon, and a soft buttercream yellow box wrapped in a dusty sage blue ribbon.
These mini present ornaments make delightful stash-busting projects that work up quickly using simple single crochet stitches worked in the round with precise corner shaping. Whether you are looking to deck your own tree, embellish holiday gift packages as reusable gift tags, create festive garlands, or crochet thoughtful secret Santa gifts, this pattern provides a satisfying and polished result every time.
Beyond tree ornaments, these mini gift boxes can be customized infinitely to suit any occasion. Switch up the color palette to pastel tones for baby showers, bright jewel tones for birthday favors, or classic black and gold for New Year celebrations. By adjusting your yarn weight and hook size, you can easily scale these cubes from delicate mini tree baubles to cozy tabletop decorations.
🔍 C. MAIN PATTERN OVERVIEW
The Mini Gift Box Ornament Duo set consists of two structured crochet cubes worked with tight single crochet stitches, firmly stuffed, and wrapped with flat crochet ribbon straps topped with a double-loop bow and an extended hanging cord.
- Box A (Crimson & Cream): A deep burgundy/crimson red crocheted box featuring a textured cream ribbon band wrapped vertically and horizontally, tied with a decorative top bow and a secure cream hanging loop.
- Box B (Buttercream & Sage Blue): A soft buttercream yellow crocheted box wrapped in a contrasting dusty teal/sage blue ribbon band, completed with a matching sage bow and hanging loop.
🎯 D. SKILL LEVEL
Skill Level: Easy / Advanced Beginner
This project is ideal for crocheters who are familiar with basic amigurumi techniques and working in continuous or joined rounds.
- 🌀 Working in continuous spiral rounds
- ➕ Basic increases (
inc) and decreases (dec) - 📐 Stitch placement and corner manipulation to form a distinct cube silhouette
- 🧵 Flat chain/slip stitch or single crochet strip construction for ribbon bands
- 🪡 Neat assembly, stuffing, and invisible seam joining
📏 E. FINISHED SIZE
- Cube Height: Approx. 2.25 inches (5.7 cm)
- Cube Width: Approx. 2.25 inches (5.7 cm)
- Cube Depth: Approx. 2.25 inches (5.7 cm)
- Hanging Loop Length: Approx. 4.0 inches (10.2 cm) folded
Note: Yarn tension, hook size, and stuffing density will affect final dimensions. Working with a smaller hook ensures dense stitches that keep stuffing completely hidden.
🧮 F. GAUGE
- Gauge: 20 sc x 22 rounds = 4 inches (10 cm) using a 2.75 mm (C/2) crochet hook.
- Tension Note: Precise gauge is not critical for this ornament, but maintaining a tight, uniform tension is essential to prevent fiberfill from showing through the stitches and to preserve sharp square corners.
🧶 G. REQUIRED YARN AMOUNTS
All yarn estimates are based on DK or Light Worsted Weight (#3) Cotton or Cotton Blend Yarn:
- 🔴 Main Color A (Crimson Red): Approx. 35 yds (32 m) / 15 g
- ⚪ Accent Color A (Cream/Off-White): Approx. 18 yds (16 m) / 8 g
- 🟡 Main Color B (Buttercream Yellow): Approx. 35 yds (32 m) / 15 g
- 🫐 Accent Color B (Dusty Sage/Teal Blue): Approx. 18 yds (18 m) / 8 g
- ☁️ Polyester Fiberfill: Approx. 20–25 g total for both boxes
🧰 H. MATERIALS
- 🪡 Crochet Hook: 2.75 mm (US C/2 or B/1 depending on tension)
- 🧶 Yarn: Cotton or cotton-acrylic blend yarn in Crimson Red, Cream, Buttercream Yellow, and Dusty Sage Blue
- ☁️ Stuffing: High-loft polyester fiberfill
- ✂️ Tools: Tapestry/yarn needle, sharp scissors, stitch markers, straight pins for placement
- 📐 Optional Support (for crisp edges): 2″ x 2″ square plastic canvas inserts or thin cardboard squares (optional, for ultra-sharp cube edges)
🔤 I. ABBREVIATIONS – US TERMS
- ch: chain
- sc: single crochet
- inc: single crochet increase (2 sc in the same stitch)
- dec: single crochet invisible decrease
- sl st: slip stitch
- st(s): stitch(es)
- rnd(s): round(s)
- BLO: back loop only
- FLO: front loop only
- MR: magic ring / adjustable loop
- FO: fasten off
📝 J. NOTES BEFORE YOU BEGIN
- 🌀 Spiral Construction: The cube bases are worked in continuous spiral rounds without joining at the end of each round unless specified. Place a stitch marker in the first stitch of each round to track progress.
- 📦 Cube Shaping: To achieve a realistic 3D box shape rather than a round ball, corner increases are placed at four equal points along the top and bottom faces, combined with a BLO round to form sharp edge transitions.
- ☁️ Stuffing Technique: Stuff firmly, ensuring stuffing reaches into all eight corners of the cube. Do not overstuff to the point where stitches stretch open.
- 🎀 Ribbon Construction: The ribbon strips are worked separately as flat narrow bands, pinned tightly around the stuffed box, and secured with matching yarn.
🪡 K. COMPLETE PATTERN
🎁 BOX 1: CRIMSON RED BOX
📦 Box Base (Make 1 in Crimson Red)
Worked from the top face center, down the sides, to the bottom closure.
- Rnd 1: MR, 4 sc into ring. (4)
- Rnd 2: 3 sc in each st around. (12)
- Rnd 3: 1 sc, 3 sc in next st, [2 sc, 3 sc in next st] x3, 1 sc. (20)
- Rnd 4: 2 sc, 3 sc in next st, [4 sc, 3 sc in next st] x3, 2 sc. (28)
- Rnd 5: 3 sc, 3 sc in next st, [6 sc, 3 sc in next st] x3, 3 sc. (36)
- Rnd 6: 4 sc, 3 sc in next st, [8 sc, 3 sc in next st] x3, 4 sc. (44)
- Rnd 7: Working in BLO for this round only: 1 sc in each st around. (44)
- Rnds 8–18 (11 rnds): Working through both loops: 1 sc in each st around. (44)
- Rnd 19: Working in BLO for this round only: 4 sc, dec3 (sc 3 sts together at corner), [8 sc, dec3] x3, 4 sc. (36)
- Rnd 20: Working through both loops: 3 sc, dec3, [6 sc, dec3] x3, 3 sc. (28)
- Begin stuffing firmly, pressing fiberfill into corners.
- Rnd 21: 2 sc, dec3, [4 sc, dec3] x3, 2 sc. (20)
- Rnd 22: 1 sc, dec3, [2 sc, dec3] x3, 1 sc. (12)
- Top off stuffing to ensure a smooth, flat bottom face.
- Rnd 23: [dec] x6. (6)
- FO: Cut yarn leaving a 6″ tail. Weave tail through FLO of remaining 6 sts, pull tight to close, and weave in end.
🎀 Long Wrapping Ribbon Strip (Make 1 in Cream)
Worked in flat row strips to wrap seamlessly around all four vertical sides.
- Ch 91.
- Row 1: Starting in 2nd ch from hook, 1 sc in each ch across. (90)
- FO: Leave a 12″ tail for sewing.
🎀 Bow Loops & Tails (Make 1 in Cream)
- Bow Loops: Ch 32. Join with sl st to first ch to form a loop (taking care not to twist).
- Rnd 1: Ch 1, 1 sc in each ch around, sl st to first sc. (32)
- FO: Leave an 8″ tail. Wrap the center of the ring tightly with the yarn tail to form two equal bow loops. Tie securely.
- Hanging Loop: Ch 45 in Cream. FO, leaving a small tail at both ends.
🎁 BOX 2: BUTTERCREAM YELLOW BOX
📦 Box Base (Make 1 in Buttercream Yellow)
Worked identically to Box 1.
- Rnd 1: MR, 4 sc into ring. (4)
- Rnd 2: 3 sc in each st around. (12)
- Rnd 3: 1 sc, 3 sc in next st, [2 sc, 3 sc in next st] x3, 1 sc. (20)
- Rnd 4: 2 sc, 3 sc in next st, [4 sc, 3 sc in next st] x3, 2 sc. (28)
- Rnd 5: 3 sc, 3 sc in next st, [6 sc, 3 sc in next st] x3, 3 sc. (36)
- Rnd 6: 4 sc, 3 sc in next st, [8 sc, 3 sc in next st] x3, 4 sc. (44)
- Rnd 7: Working in BLO only: 1 sc in each st around. (44)
- Rnds 8–18 (11 rnds): Working through both loops: 1 sc in each st around. (44)
- Rnd 19: Working in BLO only: 4 sc, dec3, [8 sc, dec3] x3, 4 sc. (36)
- Rnd 20: Working through both loops: 3 sc, dec3, [6 sc, dec3] x3, 3 sc. (28)
- Stuff firmly.
- Rnd 21: 2 sc, dec3, [4 sc, dec3] x3, 2 sc. (20)
- Rnd 22: 1 sc, dec3, [2 sc, dec3] x3, 1 sc. (12)
- Rnd 23: [dec] x6. (6)
- FO: Weave tail through FLO of remaining 6 sts, pull tight, and hide end inside.
🎀 Long Wrapping Ribbon Strip (Make 1 in Dusty Sage Blue)
- Ch 91.
- Row 1: Starting in 2nd ch from hook, 1 sc in each ch across. (90)
- FO: Leave a 12″ tail for sewing.
🎀 Bow Loops & Tails (Make 1 in Dusty Sage Blue)
- Bow Loops: Ch 32. Join with sl st to first ch to form a loop.
- Rnd 1: Ch 1, 1 sc in each ch around, sl st to first sc. (32)
- FO: Leave an 8″ tail to wrap and pinch center into bow shape.
- Hanging Loop: Ch 45 in Dusty Sage Blue. FO.
🎨 L. STYLING / ASSEMBLY / STABILITY / FINAL SHAPING
           [ Hanging Loop ]
                 ||
            [ Bow Loops ]
                 ||
         +---------------+
         |  Top Ribbon   |
    +----+---------------+----+
    |    |   BOX FACE    |    |
    | R  |               | R  |
    | I  |               | I  |
    | B  |               | B  |
    | O  |               | O  |
    | N  |               | N  |
    +----+---------------+----+
         | Bottom Ribbon |
         +---------------+
1. Ribbon Placement & Attachment
- Take the Long Ribbon Strip and center it across the top face of the box.
- Wrap both ends down opposing side walls, cross them over each other on the bottom face, and bring them up the remaining two opposing side walls back to the top center.
- Pin the ribbon in place so it forms a neat cross (+) on all four side panels, top, and bottom.
- Using a tapestry needle and matching yarn thread, tack the ribbon down with small, hidden stitches along the ribbon edges.
2. Bow & Loop Assembly
- Pin the pre-shaped Bow Loops to the exact center top of the box where the ribbon bands intersect.
- Stitch the bow down firmly through the center pinch point.
- Thread the Hanging Loop through the center of the bow cross-section, knotting both free ends together underneath the bow. Hide the knot inside the body of the box using a tapestry needle.
3. Recommended Assembly Sequence
- Crochet Box Base & Stuff
- Close Box Bottom cleanly
- Crochet Long Ribbon Strip
- Pin & Sew Ribbon Cross to Box
- Construct Bow & Attach to Center Top
- Attach Hanging Loop to Center Top
💡 M. HELPFUL CROCHET TIPS
- 💡 Pinch the Corners: After stuffing and closing, gently pinch the 8 corner points of the box between your fingers to accentuate the crisp, square geometry.
- 💡 Avoid Ribbon Twist: Pin your ribbon completely around the cube before sewing a single stitch to ensure the chain strip doesn’t twist along the back or sides.
- 💡 Opt for Cotton: 100% mercerized or semi-cotton yarn provides superior stitch definition and structure compared to soft acrylics, helping the gift box hold its shape over time.
- 💡 Sharp Insert Option: For ultra-sharp edges, cut six small squares of plastic canvas or thin cardstock and place them against the inner walls before inserting fiberfill.
- 💡 Tension Balance: Keep ribbon strip tension moderately snug so it clings neatly to the box sides without causing the stuffed cube to bow inward.
🧼 N. CARE INSTRUCTIONS
- 🧼 Spot Cleaning: Spot clean with a damp cloth and mild liquid soap. Do not submerge completely to prevent stuffing from clumping.
- 💨 Drying: Air dry thoroughly in a warm, shaded area. Reshape corners gently while damp.
- 📦 Storage: Store flat in a dry box during off-season months. Avoid placing heavy holiday decor on top of ornaments to maintain structural shape.
❓ R. FAQ
❓ Can I use weight #4 worsted yarn instead of DK weight?
Yes! Using worsted weight yarn with a 3.5 mm hook will simply yield a larger gift box ornament (approximately 3 to 3.5 inches square). Ensure you scale up yarn amounts accordingly.
❓ How do I make the sides of the gift box completely flat?
The back-loop-only (BLO) rounds at Rnd 7 and Rnd 19 create clean fold lines. Combining dense stitch tension with firm, evenly distributed stuffing will keep the box faces flat and structured.
❓ Are these ornaments safe for homes with young children or pets?
Yes, because all parts are completely crocheted and sewn without small plastic safety eyes or metal wires. Ensure all ends and loops are securely fastened.
❓ Can I add embroidery or embellishments to the gift box?
Absolutely! French knot “polka dots,” embroidered snowflakes, or metallic thread woven into the ribbon make wonderful personalized additions.