📖 B. INTRODUCTION
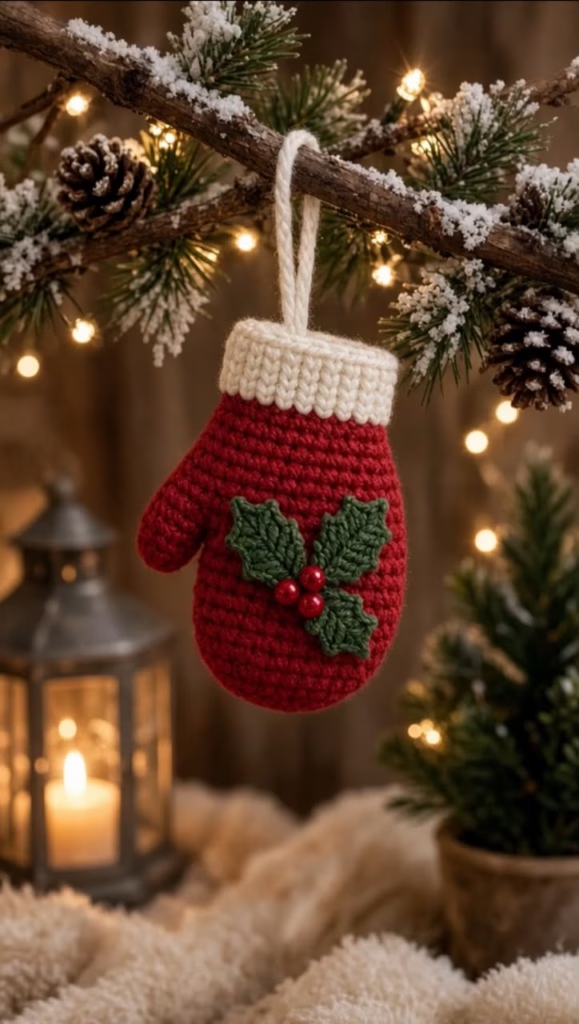
Capture the cozy charm of the holiday season with this delightful crocheted miniature mitten. Based on classic winter silhouettes, this pattern features a beautifully textured red mitten base complemented by a thick, snowy white ribbed cuff. The centerpiece of the design is a classic festive applique consisting of three textured green holly leaves and a cluster of glossy red berries.
This project is an ideal weekend make for the holiday season. Because it works up quickly using small amounts of worsted weight yarn, it is perfect for stash-busting. These little mittens shine when hung directly on the branches of a Christmas tree via their simple white hanging loop. They also make charming custom gift wrap toppers, festive garland elements, or thoughtful handmade teacher gifts.
You can easily personalize this pattern to fit any aesthetic. Swap the traditional crimson for a soft pastel pink or frosty blue, add metallic embroidery thread to the cuff for a touch of sparkle, or embroider a loved one’s initial onto the center of the mitten before attaching the holly applique.
🔍 C. MAIN PATTERN OVERVIEW
This ornament is constructed using a modular, low-sew approach. The project is divided into three distinct phases to ensure a neat, professional finish:
- The Mitten Body: We begin by creating the thumb separately. Then, we crochet the main hand from the rounded top down. The thumb is seamlessly joined to the main hand in the round, and the piece is tapered down to the wrist.
- The Ribbed Cuff: To achieve a thick, stretchy, knit-like look at the wrist, the white cuff is worked sideways using back-loop-only stitches, joining it to the red mitten edge as you go. A simple chain loop is added for hanging.
- The Holly Applique: Three separate, spiky green leaves are crocheted flat. They are sewn onto the center front of the mitten, finished with three red beads to act as the seasonal berries.
🎯 D. SKILL LEVEL
Easy to Intermediate This pattern is accessible to adventurous beginners comfortable with working in the round, but it introduces a few intermediate techniques to elevate the final look.
Techniques Involved:
- Working in continuous rounds (amigurumi style)
- Basic increases and invisible decreases
- Joining two separate tubular pieces (thumb and hand) in the round
- Working flat rows joined to a round edge
- Crocheting in the Back Loop Only (BLO)
- Creating picots (for the holly leaf points)
- Sewing small appliques and beads
📏 E. FINISHED SIZE
When made with worsted weight (Size 4) yarn and a 3.5mm (E) hook, the finished mitten ornament measures approximately 3.5 inches (9 cm) tall from the top of the white cuff to the bottom curve of the mitten, and 2.5 inches (6.5 cm) wide across the thumb.
Size Variations: Using a thinner yarn (like DK or sport) with a 2.5mm hook will yield a smaller, daintier ornament perfect for miniature trees. Using a bulky yarn with a 5.0mm hook will create a larger piece suitable for holding a small gift card or treats.
🧮 F. GAUGE
Gauge: 5 sc stitches and 5 continuous rounds = 1 inch (2.5 cm).
Note: Exact gauge is not strictly critical for this decorative ornament. However, it is important to maintain a tight, consistent tension so that the light stuffing does not show through the red yarn of the mitten body. If you see gaps between your stitches, drop down half a hook size.
🧶 G. REQUIRED YARN AMOUNTS
This project uses small amounts of medium worsted weight (Size 4) acrylic or cotton yarn.
- 🔴 Main Color (Red): Approximately 25 yards (23 meters) for the hand and thumb.
- ⚪ Contrast Color (White): Approximately 15 yards (14 meters) for the ribbed cuff and hanging loop.
- 🟢 Accent Color (Green): Approximately 5 yards (4.5 meters) for the three holly leaves.
🧰 H. MATERIALS
Gather the following tools and supplies before starting:
- Crochet Hook: 3.5mm (US size E/4)
- Yarn: Worsted weight yarn in Red, White, and Dark Green
- Berries: 3 small round red beads (approx. 6mm – 8mm)
- Stuffing: A very small amount of polyester fiberfill
- Tapestry Needle: For sewing appliques and weaving in ends
- Sewing Needle & Thread: A standard needle and red sewing thread to securely attach the beads
- Scissors ✂️
- Stitch Marker 📍
⚠️ Safety Note: If this item will be handled by young children or pets, replace the hard red beads with small crocheted bobbles or French knots embroidered with red yarn to prevent a choking hazard.
🔤 I. ABBREVIATIONS – US TERMS
- MR: Magic Ring
- ch: chain
- sc: single crochet
- hdc: half double crochet
- sl st: slip stitch
- inc: single crochet increase (2 sc in the same stitch)
- dec: single crochet invisible decrease (sc 2 together using front loops only)
- BLO: Back Loop Only
- picot: chain 2, slip stitch into the 2nd chain from the hook
- st(s): stitch(es)
- FO: Fasten Off
📝 J. NOTES BEFORE YOU BEGIN
- Continuous Rounds: The thumb and the main body of the mitten are worked in continuous, unjoined spiral rounds. Do not slip stitch or chain 1 at the end of these rounds. Move your stitch marker up at the beginning of each new round.
- Joining the Cuff: The white cuff is worked in flat rows perpendicular to the top of the mitten. You will slip stitch into the final round of the red mitten body to anchor the ribbing as you go.
- Stuffing Strategy: Do not overstuff the mitten. It should have a soft, slightly flattened, 2D-puffy appearance rather than a rigid, round ball shape.
🪡 K. COMPLETE PATTERN
🧤 The Thumb
The thumb is made first and set aside to be joined later.
- Yarn: Red
- Make: 1
- R1: MR, 6 sc. (6)
- R2-R4 (3 rounds): sc in each st around. (6)
- FO leaving a short tail. You do not need a long sewing tail.
🧤 The Main Hand
This starts at the rounded, bottom curve of the mitten.
- Yarn: Red
- Make: 1
- R1: MR, 6 sc. (6)
- R2: inc in each st around. (12)
- R3: (1 sc, inc) x 6. (18)
- R4: (2 sc, inc) x 6. (24)
- R5-R10 (6 rounds): sc in each st around. (24)
- Do not fasten off. We will now join the thumb.
🤝 Joining Hand and Thumb
You will crochet across the stitches of the main hand, jump to the stitches of the thumb, and then continue in one large round.
- R11: sc in the next 24 sts of the hand. Pick up the thumb. sc in the 6 sts around the thumb. (30)
- Tip: Use the short tail left on the thumb to sew shut any small gap that forms at the juncture between the thumb and hand.
- R12: (3 sc, dec) x 6. (24)
- R13: (2 sc, dec) x 6. (18)
- R14-R15 (2 rounds): sc in each st around. (18)
- FO the red yarn and weave in the end. Lightly stuff the bottom of the hand and the thumb now. Keep the top near the wrist relatively flat.
❄️ The Ribbed Cuff
The cuff is worked sideways, attaching to R15 of the mitten body.
- Yarn: White
- Join: Attach white yarn with a slip stitch to any stitch of R15 on the back side of the mitten.
- Chain: ch 7.
- Row 1: sc in the 2nd ch from the hook and in each of the next 5 chs down back toward the mitten edge. (6 sc). Sl st into the next 2 unworked sts of R15 on the mitten. Turn your work.
- Row 2: Skip the 2 sl sts on the edge. Working in BLO, sc in the next 6 sts up the ribbing. ch 1, turn. (6)
- Row 3: Working in BLO, sc in the next 6 sts down the ribbing. Sl st into the next 2 unworked sts of R15 on the mitten. Turn. (6)
- Rows 4-18: Repeat Rows 2 and 3 around the entire opening of the mitten until all 18 stitches of R15 have been worked.
- Seaming: Fold the cuff so the first row and last row meet. Sl st them together through both thicknesses to close the cuff cylinder. Do not fasten off.
🪢 Hanging Loop
- Yarn: White (continuing from the cuff seam)
- Make: ch 18 (or until your loop is the desired length).
- Sl st back into the base of the first chain to secure the loop.
- FO and weave the tail neatly down into the inside of the mitten.
🌿 Holly Leaves
These are worked around both sides of a foundation chain to create a spiky leaf shape.
- Yarn: Green
- Make: 3
- Base: ch 7.
- Side 1: sl st in 2nd ch from hook. sc in next ch. hdc in next ch. In the next ch work: (1 dc, picot, 1 dc). hdc in next ch. sc in last ch.
- Turn: Ch 1, rotate the piece to work down the opposite (unworked) side of the foundation chain.
- Side 2: sc in first ch. hdc in next ch. In the next ch work: (1 dc, picot, 1 dc). hdc in next ch. sc in next ch. sl st in the final space.
- FO leaving a 6-inch tail for sewing.
🎨 L. STYLING / ASSEMBLY / STABILITY / FINAL SHAPING
Correct assembly is what gives this ornament its polished, festive look. Follow this sequence:
- Flatten the Base: Press the mitten flat between your hands. The thumb should stick out clearly to the left or right (depending on which side you choose as the front). The stuffing inside should be spread evenly so the ornament rests flat against a tree branch.
- Position the Leaves: Lay the three green leaves in the center of the red mitten base. Arrange them so the stems meet in the middle, pointing outward at roughly 10 o’clock, 2 o’clock, and 6 o’clock positions.
- Sew the Leaves: Using a tapestry needle and the green yarn tails, tack down the center stem line of each leaf. Leave the spiky picot edges unsewn so they lift slightly off the mitten, adding dimension.
- Attach the Berries: Thread a standard sewing needle with strong red sewing thread. Position the three red beads in a tight triangular cluster directly over the center point where all three leaves meet. Sew through each bead 2-3 times, anchoring the thread firmly through the front layer of the mitten to ensure they do not droop.
- Final Cuff Shaping: Fold the white ribbed cuff upwards so it stands tall. Use your fingers to pinch the top edges slightly to emphasize the vertical ribbed texture.
✅ Final Shaping Checklist:
- ✅ Hanging loop is securely anchored at the top inside edge of the cuff.
- ✅ Thumb sits flat and is not overstuffed.
- ✅ The three leaves are evenly spaced.
- ✅ The bead cluster hides the joined ends of the three leaves.
- ✅ No white stuffing is visible through the red stitches.
💡 M. HELPFUL CROCHET TIPS
- 💡 Invisible Decreases: Always use invisible decreases (working through the front loops only) on the main body to prevent gaps and bumps, keeping the fabric smooth for the appliques.
- 💡 Mind the Gap: When joining the thumb to the hand, a small hole almost always forms at the armpit junction. Don’t stress! Just use the leftover tail from the thumb to whipstitch it closed from the inside before you stuff.
- 💡 Crisp Picots: When making the picot for the holly leaf, ensure your slip stitch is pulled tight to make the leaf point sharp and distinct.
- 💡 Sewing Appliques: When sewing the leaves onto the red background, only sew through the front layer of the mitten. If you sew all the way through to the back layer, you will squish the mitten flat and ruin its puffy shape.
- 💡 Stiffening (Optional): If your hanging loop is twisting, you can brush a tiny amount of liquid starch or watered-down school glue onto the chain and let it dry flat to stiffen it.
🧼 N. CARE INSTRUCTIONS
Because this item contains small hard beads and fiberfill, it should not be machine washed.
- Cleaning: Gently spot clean the yarn with a damp cloth and mild soap. Avoid rubbing the stitches vigorously to prevent the acrylic yarn from fuzzing or pilling.
- Storage: At the end of the holiday season, pack the ornament in a rigid box rather than a soft bag to prevent the holly leaves from getting permanently creased or the hanging loop from stretching.
❓ R. FAQ
❓ Can I use blanket yarn or chenille yarn for this pattern? Yes! Using plush yarn will result in a much larger, very cuddly mitten. You will need to scale up your hook size (usually to a 5.5mm or 6.0mm) and ensure you use appropriately sized jumbo beads or large crocheted bobbles for the berries so the proportions remain correct.
❓ The top of my cuff looks messy. How do I fix this? When working the sideways ribbing, make sure you are slip stitching into the exact next stitch on the mitten rim, and not accidentally skipping stitches or going into the same stitch twice. Counting your rows helps: you should have exactly 18 rows of ribbing.
❓ I don’t have beads. How do I make crocheted berries? If you prefer not to use beads, take a long strand of red yarn and a tapestry needle. Sew three chunky French knots in the center of the leaves, wrapping the yarn around the needle 3-4 times for each knot to make them thick and puffy.
❓ Is this ornament safe for toddlers to play with? No. The small plastic/glass beads are a choking hazard. If you are gifting this to a family with small children or pets, please substitute the beads with yarn embroidery as detailed above.
❓ How do I make the mitten face the other way? Because the mitten is a continuous cylinder, the “front” is simply whichever side you choose to sew the leaves onto. To make a matching pair (one left, one right), just flatten them so the thumbs point in opposite directions before you attach your appliques!