📖 B. INTRODUCTION
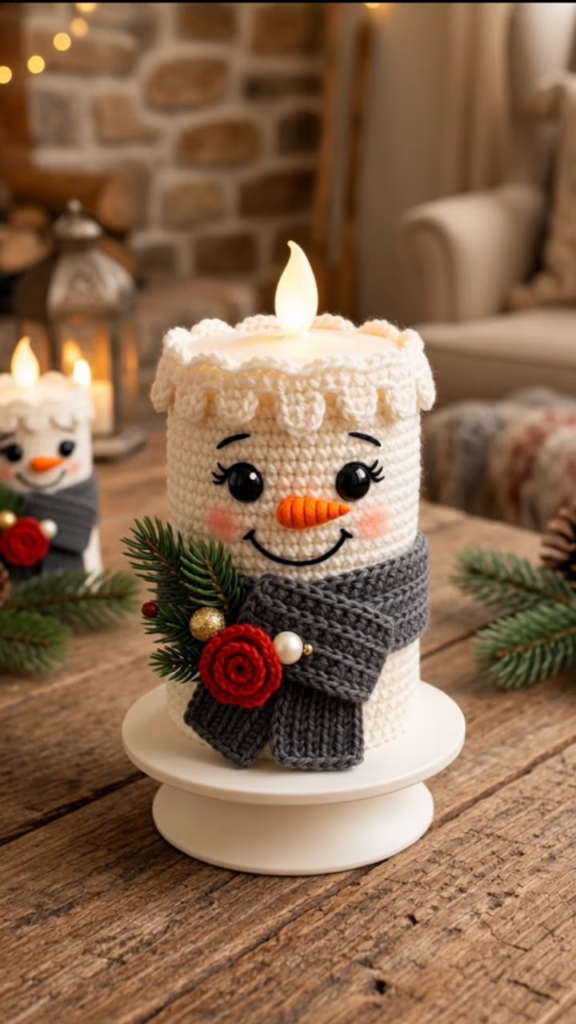
Bring a touch of whimsical winter magic to your living room with this adorable crochet snowman candle cover. Designed to slip perfectly over a standard flameless LED pillar candle, this quick and cozy project instantly transforms basic lighting into a cheerful holiday centerpiece. The design features a classic white snowman body topped with a clever “melting snow” scalloped rim that frames the glowing artificial flame.
This project is a fantastic stash-buster and makes a charming, personalized gift for teachers, neighbors, or holiday party hosts. The character’s sweet expression is brought to life with simple safety eyes, embroidered eyelashes, rosy cheeks, and a dimensional orange carrot nose.
Customizing your snowman is half the fun! While this pattern guides you through creating a handsome dark grey ribbed scarf accented with a bold red crochet rosette and faux winter greenery, you can easily swap the yarn colors to match your own holiday decor. Whether you are crocheting a single frosty friend for a side table or a whole family for your mantle piece, these candle covers are sure to become a beloved seasonal keepsake.
🔍 C. MAIN PATTERN OVERVIEW
This pattern is constructed in several simple, modular components that are assembled at the end to create the final snowman character.
- The Main Sleeve: A simple white cylinder worked in the round from the bottom up, creating a snug sleeve for a 3-inch diameter flameless candle.
- The Melting Snow Rim: A textured, uneven scalloped edge worked directly into the top of the main sleeve to mimic dripping snow.
- Facial Features: A tiny conical orange nose is crocheted and sewn to the center of the face, surrounded by inserted safety eyes, embroidered lashes, and a wide, friendly smile.
- Winter Accessories: A separate, textured dark grey scarf is wrapped around the lower half of the sleeve, finished with a bright red coiled rosette and accented with optional faux pine sprigs and baubles.
🎯 D. SKILL LEVEL
Easy to Intermediate
This pattern uses foundational crochet stitches but requires some basic shaping and neat finishing techniques for the facial embroidery.
- Working in continuous rounds and flat rows
- Basic decreases and increases
- Crocheting in the back loop only (BLO) for ribbing
- Simple amigurumi sewing and facial embroidery
📏 E. FINISHED SIZE
- Height: Approximately 4.5 inches (11.5 cm) tall, excluding the scarf.
- Width: Approximately 3.25 inches (8.25 cm) in diameter.
- Fit: Designed to stretch comfortably over a standard 3-inch (7.6 cm) diameter flameless LED pillar candle.
- Adjustments: You can easily increase the starting chain circumference to fit wider candles, or add/subtract rounds to the main body to accommodate taller or shorter candles.
🧮 F. GAUGE
- Gauge: 16 single crochet stitches and 18 rounds = 4 inches (10 cm).
- Note on Gauge: Because this acts as a fitted sleeve, check your diameter after the first few rounds by sliding it over your specific LED candle. It should fit snugly so it doesn’t slip down.
🧶 G. REQUIRED YARN AMOUNTS
All yardage is estimated for a medium #4 Worsted weight yarn (acrylic or cotton).
- Main Color (MC) – White: 45-50 yards (approx. 25g) for the main cylinder and dripping edge.
- Accent Color 1 (AC1) – Dark Grey: 25 yards (approx. 15g) for the ribbed scarf.
- Accent Color 2 (AC2) – Orange: 2-3 yards (scrap amount) for the carrot nose.
- Accent Color 3 (AC3) – Red: 5 yards (scrap amount) for the rosette.
🧰 H. MATERIALS
- Hook: 4.0 mm (Size G) crochet hook.
- Yarn: Worsted weight yarn in White, Dark Grey, Orange, and Red.
- Eyes: One pair of 10mm black safety eyes.
- Embroidery: Small amount of black embroidery floss or lightweight black yarn for the mouth and eyelashes.
- Candle: ⚠️ CRITICAL: One 3-inch diameter FLAMELESS LED pillar candle. Never use this crochet cover on a real, burning wax candle.
- Decorations: Small faux pine sprigs, a mini gold bauble, and a pearl bead (optional, for scarf cluster).
- Tools: Tapestry/yarn needle, stitch markers, scissors, sewing pins.
- Makeup: A soft pink blush and a cotton swab or small brush for the cheeks.
🔤 I. ABBREVIATIONS – US TERMS
- ch = chain
- sc = single crochet
- hdc = half double crochet
- dc = double crochet
- sl st = slip stitch
- inc = single crochet increase (2 sc in one stitch)
- dec = single crochet decrease (invisible decrease preferred)
- BLO = back loop only
- FLO = front loop only
- MR = magic ring
- st(s) = stitch(es)
- ( … ) x N = repeat instructions in parentheses N times
📝 J. NOTES BEFORE YOU BEGIN
- Continuous Rounds: The main white sleeve and the orange nose are worked in continuous, unjoined spiral rounds. Use a stitch marker to mark the first stitch of each round and move it up as you go.
- Flat Rows: The dark grey scarf is worked in flat rows, turning at the end of each row.
- Sizing Check: LED candles can vary slightly in diameter. After Round 3 of the main sleeve, slide the ring over your candle. If it is too loose, restart with fewer chains; if it cannot stretch over the base, restart with a few extra chains.
- Sewing: Leave long yarn tails (about 8-10 inches) when fastening off the nose, scarf, and rosette to make sewing them to the main piece easier.
🪡 K. COMPLETE PATTERN
⛄️ Main Candle Cover (Sleeve)
Use White yarn.
Foundation: Ch 42. Taking care not to twist the chain, sl st to the first ch to form a ring.
R1: Ch 1 (does not count as st), sc in each ch around. Do not join. (42)
Place a stitch marker in the first st of R2 to mark the start of your continuous rounds.
R2 – R22: sc in each st around. (42)
Check fit: Slide the sleeve onto your LED candle. It should reach just below the top edge of the candle. Add or subtract rounds here if your candle is taller or shorter.
R23: sc in each st around. (42)
R24: Working in the FLO for this round only, sl st in the first 2 sts to even out the height.
Do not fasten off. Continue directly to the Melting Snow Rim.
💧 Melting Snow Rim
Continue with White yarn, working from where you left off at the end of R24. The rim creates uneven “drips” hanging over the edge. Drip Pattern:
- sl st in next st.
- (Short drip): Ch 3, sc in 2nd ch from hook, sc in next ch. sl st in the next 2 sts on the main body.
- sl st in next st.
- (Long drip): Ch 4, sc in 2nd ch from hook, hdc in next 2 chs. sl st in the next 3 sts on the main body.
- (Tiny drip): Ch 2, sc in 2nd ch from hook. sl st in the next 2 sts on the main body.Continue around: Repeat steps 1-5 around the top edge of the sleeve to create a random, melting effect. When you reach the start of the round, sl st into the first sl st.Fasten off and weave in the white ends.
🥕 Carrot Nose
Use Orange yarn. R1: 4 sc in a MR. (4) R2: (1 sc, inc) x2. (6) R3: sc in each st around. (6) Fasten off, leaving a long tail for sewing. Slightly pinch the tip to shape it into a cone. (Do not stuff; the piece is small enough to hold its shape).
🧣 Ribbed Scarf
Use Dark Grey yarn. Foundation: Ch 8. Row 1: hdc in the 3rd ch from hook and in each ch across. Turn. (6) Row 2 – Row 42: Ch 2 (does not count as st), hdc in the BLO of each st across. Turn. (6) Check the length: Wrap the scarf around the bottom half of your snowman sleeve. It should overlap comfortably at the front. Add rows if needed. Fasten off, leaving a 12-inch tail for securing the scarf to the body.
🌹 Decorative Rosette
Use Red yarn. Foundation: Ch 12. Row 1: 2 dc in the 3rd ch from the hook, 3 dc in each remaining ch across. Fasten off, leaving a long tail. The piece will naturally curl. Roll it into a tight spiral rose shape and use the yarn tail to sew through the base layers to secure the flower.
🎨 L. STYLING / ASSEMBLY / STABILITY / FINAL SHAPING
Correct placement brings your snowman to life! Slide the white sleeve onto the LED candle before doing the final facial embroidery, as the stretch will affect the position of the features.
- Safety Eyes & Eyelashes:
- Locate the front-center of your sleeve.
- Insert the 10mm safety eyes between R14 and R15, spaced about 5 stitches apart.
- Tip: If you have already stretched the sleeve over a hard plastic LED candle, you will need to slide it off temporarily to snap the safety eye washers onto the back.
- Using black embroidery floss, stitch two small, upward-curving eyelashes at the outer corner of each eye.
- Attach the Nose:
- Pin the orange carrot nose securely between the eyes, resting on R13 and R14.
- Sew it down using the orange yarn tail, going through both the nose base and the white body stitches.
- Embroider the Smile:
- Using black embroidery floss, stitch a wide, U-shaped smile spanning about 6 stitches wide, dipping down to R10 or R11. Keep the line smooth and even.
- Add Rosy Cheeks:
- Take a small makeup brush or cotton swab and lightly dab pink blush onto the white yarn just below the outer edges of the eyes. Build the color slowly!
- Wrap and Secure the Scarf:
- Wrap the dark grey ribbed scarf around the lower section of the snowman (covering approx R2 through R9).
- Cross one end over the other at the front, slightly off-center.
- Use the dark grey yarn tail to stitch the crossed layers together and tack them invisibly to the white body so the scarf won’t slip off.
- Attach Embellishments:
- Sew the red rosette to the center of the crossed scarf joint.
- Tuck small faux pine sprigs, a gold bauble, and a pearl bead behind the rosette. Secure them with hot glue or by sewing over their stems with a needle and thread.
💡 M. HELPFUL CROCHET TIPS
- 💡 Keep it Tight: Crochet the main body with firm tension. A snug sleeve will grip the slippery plastic or wax of the flameless candle securely and prevent slouching.
- 💡 Invisible Finish: When completing the dripping snow rim, use an invisible join to fasten off so there isn’t a harsh knot right at the top edge of your display.
- 💡 Hide the Seam: Although worked in a spiral, the start of your rounds might have a slight jog at the bottom. Ensure this section is placed at the back of the candle before you begin placing the facial features.
- 💡 No-Sew Scarf Option: If you prefer, you can leave the scarf unattached to the body and simply use a small safety pin hidden behind the rosette to hold it together. This makes the cover easier to wash.
- 💡 Blush Application: Real cosmetic blush works wonderfully on acrylic yarn, but always test it on a scrap piece of white yarn first to ensure it blends well and doesn’t look too harsh.
- 💡 Embellishment Flexibility: The faux pine and baubles can easily be found in the miniature or floral sections of craft stores. Small festive buttons work perfectly too!
🧼 N. CARE INSTRUCTIONS
- Removal: Always remove the crochet cover from the LED candle before cleaning.
- Washing: Gently hand wash or spot clean only, using cold water and a mild detergent. The cosmetic blush will likely wash out and need to be reapplied once dry.
- Drying: Lay flat to dry on a clean towel. Do not wring or twist the cover, as this will distort the cylindrical shape.
- Storage: Store flat in a ziplock bag or tissue paper during the off-season to prevent dust accumulation on the white yarn.
❓ R. FAQ
❓ Can I use this cover on a real wax candle that I plan to light?
No. This pattern is designed strictly for battery-operated, flameless LED candles. Yarn is highly flammable, and placing a crochet cover near an open flame is a severe fire hazard.
❓ My cover is too loose and slides down the candle. What did I do wrong?
Your tension may be looser than the pattern gauge, or your yarn might be slightly thinner. You can fix this by starting with a shorter foundation chain (e.g., Ch 38 or 40 instead of 42) to achieve a tighter circumference.
❓ Can I use blanket yarn to make a giant snowman?
Yes! If you use super bulky blanket yarn and an appropriately sized hook (like an 8.0mm), the cover will be significantly larger. It would make a great cover for a very large, multi-wick LED pillar candle or even a small round decorative pillow form.
❓ Are safety eyes actually safe for young children?
Safety eyes are generally secure once the backings are snapped in place, but they can still pose a choking hazard for children under 3. If you are gifting this to a family with toddlers, we recommend embroidering the eyes with black yarn instead.
❓ Can I change the texture of the scarf?
Absolutely. If you don’t like working in the back loop only (BLO), you can use a standard single crochet, double crochet, or even a specialized stitch like the alpine stitch to create a completely different look for your snowman’s winter wear.