📖 B. INTRODUCTION
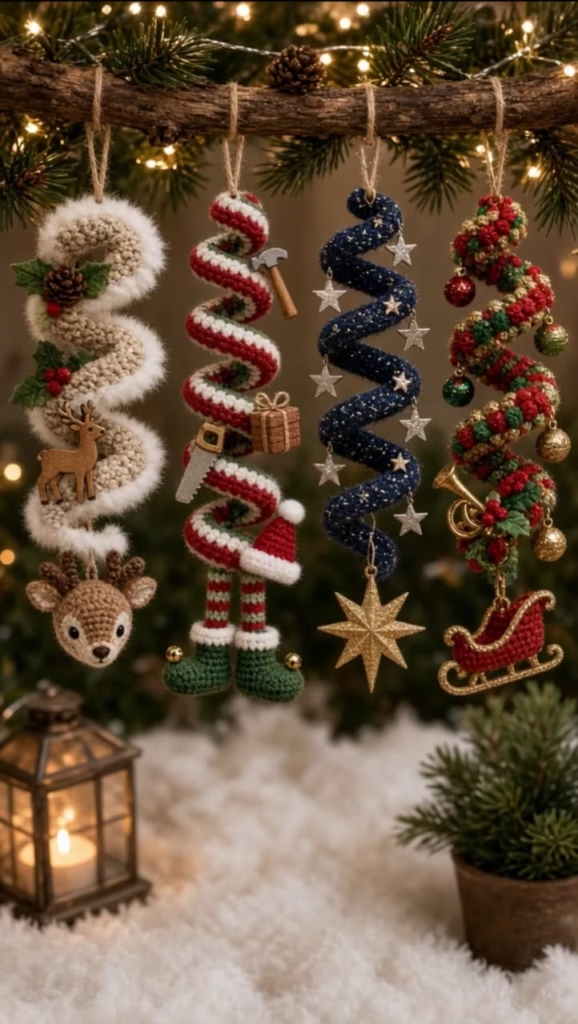
Capture the magic of the holiday season with a whimsical set of four distinctive, bouncing crochet spiral ornaments. Inspired by the charming, eclectic nature of a fully decorated tree, these hyperbolic crochet spirals are designed to dangle elegantly from branches, mantelpieces, or holiday garland. Each ornament combines a mesmerizing twisted silhouette with miniature amigurumi characters and crafting accessories to tell its own festive story.
Whether you are looking to create a complete matching set for your home, craft personalized gifts for loved ones, or simply use up scrap yarn from your holiday stash, this project offers endless personalization. You can craft the rustic Woodland deer, the playful Santa’s Workshop elf, the elegant midnight Starlight, or the nostalgic Classic sleigh. By altering the yarn colors, edging techniques, and attached charms, these quick-to-work spirals become miniature, customizable centerpieces for your holiday decor.
🔍 C. MAIN PATTERN OVERVIEW
This pattern uses the technique of hyperbolic crochet—placing multiple stitches into a single base chain—to create a natural, springy spiral. The foundation for all four ornaments is incredibly similar, making this an easy pattern to batch-produce.
Once the base spirals are complete, the pattern diverges into four distinct themes:
- The Woodland Spiral: A rustic beige base bordered in fuzzy white yarn. It features an amigurumi deer head at the base and is decorated with woodland charms.
- The Workshop Spiral: A candy-cane striped spiral ending in a comical amigurumi Santa hat and dangling elf legs.
- The Starlight Spiral: A deep navy blue and metallic spiral adorned purely with star charms.
- The Classic Spiral: A textured red and green spiral bursting with traditional mini-ornaments and finishing with a classic red sleigh.
🎯 D. SKILL LEVEL
Skill Level: Easy to Intermediate
This project is highly accessible for adventurous beginners comfortable with basic stitches, but incorporates a few intermediate techniques for the amigurumi finishing details.
- Working multiple stitches into a single chain (hyperbolic crochet).
- Working in continuous rounds (for the amigurumi details).
- Mid-row color changes (for the Workshop stripes).
- Working with specialty/faux-fur yarn (for the Woodland trim).
- Basic sewing and amigurumi assembly.
📏 E. FINISHED SIZE
- Length (Un-stretched): Approximately 10 inches (25.5 cm) from the top hanging loop to the bottom charm.
- Width (Spiral): Approximately 2.5 inches (6.5 cm) across the widest part of the twist.
- Note: The finished length will vary based on how tightly you coil the spiral and the weight of the charms attached to the bottom. Heavy charms will gently elongate the spiral over time.
🧮 F. GAUGE
- Spirals: 16 hdc and 12 rows = 4 inches (10 cm) using a 4.0mm hook.
- Amigurumi Elements: 20 sc and 22 rounds = 4 inches (10 cm) using a 3.25mm hook.
- Note: Exact gauge is not critical for the spirals. However, for the amigurumi deer head and elf legs, ensure your tension is tight enough so that the fiberfill stuffing does not show through your stitches.
🧶 G. REQUIRED YARN AMOUNTS
All yardages are approximate and based on standard medium/worsted weight (Category 4) acrylic or cotton-blend yarn.
- Woodland: ~35 yds Beige/Tan, ~15 yds Fuzzy/Faux Fur White, ~15 yds Light Brown (for deer), scrap of Dark Brown.
- Workshop: ~25 yds Red, ~25 yds White, ~15 yds Kelly Green (for elf boots).
- Starlight: ~45 yds Navy Blue (preferably with metallic thread woven in).
- Classic: ~30 yds Deep Red, ~20 yds Forest Green.
🧰 H. MATERIALS
- Hooks: 4.0mm (G) for the spirals; 3.25mm (D) for the amigurumi elements.
- Stuffing: High-quality polyester fiberfill.
- Eyes: One pair of 8mm safety eyes (for the deer).
- Hardware & Charms:
- Twine or metallic cord for hanging loops. JPEG
- Woodland: Mini wooden deer cutout, mini pinecones, faux holly leaves. JPEG
- Workshop: Mini dollhouse tools (hammer, saw), mini gift box, 2 tiny gold jingle bells. JPEG
- Starlight: Assorted small silver star buttons or charms, 1 large gold star pendant. JPEG
- Classic: Mini plastic bulb ornaments, mini gold French horn, mini sled charm. JPEG
- Tools: Tapestry needle, stitch markers, sharp scissors, and craft glue or hot glue (for attaching non-crochet charms).
- ⚠️ Safety Note: This item uses small safety eyes and miniature charms that pose a choking hazard. It is intended for decorative use only, not as a toy for small children or pets.
🔤 I. ABBREVIATIONS – US TERMS
- ch: chain
- st(s): stitch(es)
- sl st: slip stitch
- sc: single crochet
- hdc: half double crochet
- dc: double crochet
- inc: increase (2 sc in same st)
- dec: decrease (invisible decrease preferred: sc 2 together through front loops only)
- MR: magic ring
- BLO: back loop only
- FO: fasten off
📝 J. NOTES BEFORE YOU BEGIN
- Spiral Construction: The base spirals are worked in flat rows, turning at the end of each row. Because we place 3 stitches into every stitch, the fabric will naturally and forcefully curl in on itself.
- Amigurumi Construction: The deer head, elf legs, and Santa hat are worked in continuous spirals. Do not join with a slip stitch or turn at the end of the round unless explicitly instructed. Use a stitch marker to keep track of the first stitch of each round.
- Color Changes: For clean color changes in amigurumi, work the final yarn over of the stitch prior to the color change with the new color.
- Assembly: It is easiest to sew the amigurumi pieces to the bottom of the spiral before you glue or sew the miniature hard charms along the body of the spiral.
🪡 K. COMPLETE PATTERN
🌀 THE BASE SPIRAL (Make 1 per ornament)
The core spiral structure is the same for all designs. Follow these base instructions, using the specific color layouts provided for each theme below.
- Row 1: With your 4.0mm hook, ch 46. Hdc in the 3rd ch from the hook, and in each ch across. (44 hdc)
- Row 2: Ch 2 (does not count as st), turn. Work 3 dc in the very first st, and 3 dc in every st across. (132 dc).
- Note: The piece will begin to curl wildly. Just let it twist as you work.
- Row 3 (Edging): Ch 1, turn. Sc in each st across. (132 sc). FO, leaving a long tail if you plan to sew a charm to the bottom.
🦌 THE WOODLAND SPIRAL
- Spiral Colors: Work Row 1 and Row 2 in Beige/Tan. Work Row 3 in Fuzzy White yarn.
🦌 Amigurumi Deer Head Uses 3.25mm hook and Light Brown yarn.
- R1: MR 6. (6)
- R2: inc x 6. (12)
- R3: (1 sc, inc) x 6. (18)
- R4: (2 sc, inc) x 6. (24)
- R5-8: sc in each st around. (24) 4 rounds
- R9: (2 sc, dec) x 6. (18)
- Place 8mm safety eyes between R6 and R7, about 5 sts apart.
- R10: (1 sc, dec) x 6. (12)
- Stuff the head firmly.
- R11: dec x 6. (6). FO, weave tail through remaining front loops to close.
🦌 Deer Snout Uses 3.25mm hook and Beige/Tan yarn.
- R1: MR 6. (6)
- R2: inc x 6. (12)
- R3: sc in each st around. (12). FO, leaving a long tail for sewing. Embroider a small dark brown nose on the tip. Sew to the lower front of the face.
👂 Deer Ears (Make 2) Uses Light Brown yarn.
- Ch 4. In 2nd ch from hook work: sc, hdc in next st, sc in last st. FO, leaving a tail for sewing. Sew to R8 of the head.
🌿 Deer Antlers (Make 2) Uses Dark Brown yarn.
- Ch 5. Sl st in 2nd ch from hook and next ch. Ch 3 (for the branch). Sl st down the 2 chs of the branch, then sl st down the remaining 2 chs of the main stem. FO, leaving a tail. Sew just inside the ears.
🎅 THE WORKSHOP SPIRAL
- Spiral Colors: To achieve the chunky stripes, we will alternate colors in Row 2.
- Row 1: Red.
- Row 2: Ch 2. (With Red: 3 dc in next 2 sts. With White: 3 dc in next 2 sts). Repeat this alteration across all 44 sts. Carry the unused yarn inside the stitches to avoid weaving in dozens of ends.
- Row 3 (Edging): Sl st in each st across, matching the color of the stitch below it.
🎓 Santa Hat Base Uses 3.25mm hook and Red yarn.
- R1: MR 4. (4)
- R2: (1 sc, inc) x 2. (6)
- R3: (2 sc, inc) x 2. (8)
- R4: (3 sc, inc) x 2. (10)
- R5: (4 sc, inc) x 2. (12)
- R6: (1 sc, inc) x 6. (18)
- R7-8: sc in each st around. (18)
- R9: Switch to White yarn. In BLO, sc in each st around. (18)
- R10: (In both loops) sc in each st around. (18). FO, leaving a tail. Lightly stuff the cone.
🧝 Elf Legs & Boots (Make 2) Uses 3.25mm hook. Start with Green yarn.
- R1: MR 6. (6)
- R2: sc in each st around. (6)
- R3: (1 sc, inc) x 3. (9)
- R4-5: sc in each st around. (9)
- R6 (Heel): ch 1, turn, sc in next 4 sts. Turn, sc in 4 sts. Turn, dec x 2. (This creates a tiny heel flap).
- R7: Working back in the round around the whole opening, pick up 10 sc evenly. (10)
- R8: dec x 5. (5).
- R9 (Leg): Switch to White yarn. sc in each st around. (5)
- R10: Switch to Red. sc in each st around. (5)
- R11-18: Continue alternating White and Red every round. FO after R18. Do not stuff the legs so they dangle freely. Sew a tiny gold bell to the tip of R1.
- Assembly for Workshop base: Sew the top of the two legs into the open base of the Santa Hat. Then sew the top of the Santa hat to the bottom of the spiral.
✨ THE STARLIGHT SPIRAL
- Spiral Colors: Work Rows 1, 2, and 3 entirely in Navy Blue yarn. If available, hold a strand of thin silver metallic embroidery thread together with the navy yarn as you crochet to give it a speckled, starry glow.
- Note: There are no crocheted amigurumi additions for this spiral; it relies on the large gold star pendant attached to the bottom. JPEG
🛷 THE CLASSIC SPIRAL
- Spiral Colors:
- Row 1: Red.
- Row 2: Green.
- Row 3 (Bobble Edging): Switch back to Red. Ch 1. (Sc in next 3 sts, ch 2, sl st in the 2nd ch from hook to create a picot/bobble, sc in next st). Repeat this texture pattern across the entire edge to mimic the bumpy texture seen in the reference. JPEG
- Note: There are no crocheted amigurumi additions for this spiral; it relies on the red sleigh charm attached to the bottom. JPEG
🎨 L. STYLING / ASSEMBLY / STABILITY / FINAL SHAPING
The magic of these ornaments lies in their styling and embellishments.
- Forming the Twist: Once the crochet is complete, hold the top of the spiral in one hand and the bottom in the other. Gently twist the fabric in the direction it naturally wants to curl. Manipulate the ruffles so they lay evenly stacked on top of one another.
- Attaching the Base Charm:
- Using the tail from your spiral, securely sew the top of the Deer Head, the tip of the Santa Hat, the Gold Star, or the Red Sleigh to the very bottom point of their respective spirals.
- Applying the Miniatures:
- Lay the twisted spiral flat on a table.
- Using hot glue or a needle and thread, affix the miniature items along the outer ridges of the spiral.
- Woodland: Space out the wooden deer, pinecones, and holly. JPEG
- Workshop: Attach the mini hammer, saw, and gift box. JPEG
- Starlight: Scatter the small silver stars evenly down the navy blue ridges. JPEG
- Classic: Attach the mini ornaments and the gold horn. JPEG
- Hanging Loops: Cut an 8-inch piece of rustic twine. Fold it in half, thread the loop through the very top stitch of the spiral, and pull the tails through the loop to secure it. Tie a knot at the top. JPEG
💡 M. HELPFUL CROCHET TIPS
- 💡 Taming the Curl: Hyperbolic crochet can feel unruly while you are working Row 2. Don’t fight it. Let the work curl up in your lap as you go; we will align the spirals at the end.
- 💡 Faux Fur Frustration: When working the fuzzy white edge on the Woodland spiral, you may find it hard to see your stitches. Feel for the next space with your thumb and index finger, and count your stitches to ensure you don’t skip any.
- 💡 Weighted Bottoms: The spirals stretch out beautifully when they have a little weight at the bottom. The amigurumi heads and large metal charms serve this structural purpose perfectly, pulling the spiral open enough to see the inner ridges.
- 💡 Invisible Finish: For all amigurumi components, use an invisible finish (slip stitch to the next stitch, cut yarn, and pull through with a needle imitating the top ‘V’ of a stitch) for a professional look.
- 💡 Sturdy Stripes: When carrying yarn for the Workshop stripes, ensure the carried yarn is pulled just taut enough so it doesn’t loop loosely on the back, but not so tight that it puckers the fabric.
🧼 N. CARE INSTRUCTIONS
- Because these ornaments feature glued-on craft elements, hardware, and mixed materials, they are spot clean only.
- Use a damp cloth with a tiny drop of mild detergent to dab away any dust or stains on the yarn. Do not submerge them in water, as this will ruin the wooden/metal charms and the hot glue bonds.
- Storage: At the end of the holiday season, do not crush these at the bottom of a heavy ornament box. Lay them flat in a shallow box or hang them in a dedicated ornament storage bag so they retain their springy shape for next year.
❓ R. FAQ
❓ Can I make the spirals longer or shorter? Absolutely. The length is determined entirely by the starting chain. If you want a longer spiral, chain 60 or 70. Just remember that whatever your starting chain is, you will end up with roughly three times that many double crochets in Row 2.
❓ My spiral looks flat and isn’t curling well. What did I do wrong? You may have missed placing 3 dc into every stitch. The math of hyperbolic crochet forces the curl. If you only put 1 or 2 stitches in each chain, it will only gently curve. If your stitch count is correct and it’s still flat, your tension might be too loose; try going down half a hook size.
❓ Is there a substitute for the miniature craft charms? If you cannot find mini dollhouse tools or plastic ornaments, you can absolutely crochet tiny appliques! Tiny crochet stars, simple bobble-stitch “bulbs,” or small square “gifts” can be crocheted from scrap yarn and sewn on instead.
❓ How do I prevent the amigurumi parts from drooping? Make sure the connection point between the base of the spiral and the amigurumi element is sewn tightly across multiple stitches. Do not rely on just one strand of yarn to hold the weight. Sew in a circular pattern connecting the top of the charm to the bottom row of the spiral.