📖 B. INTRODUCTION
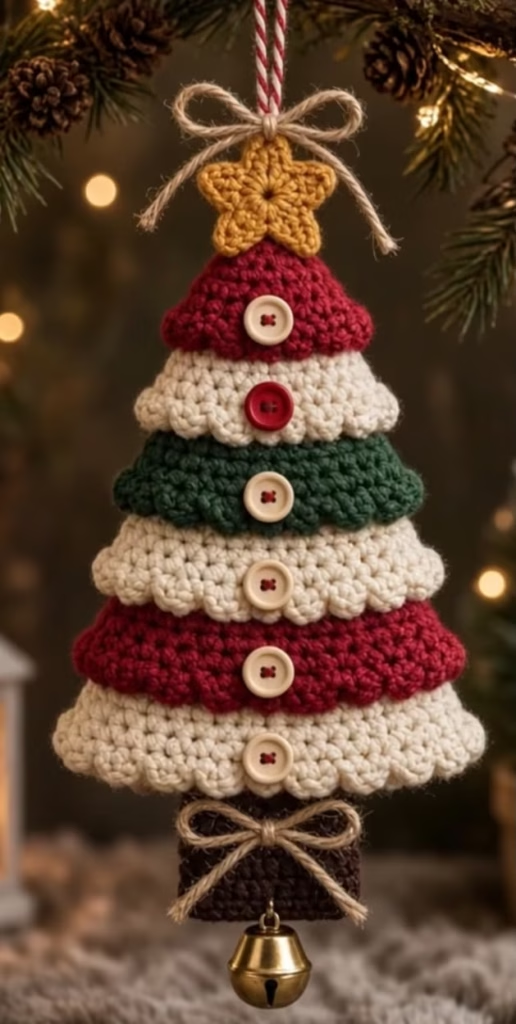
Bring a touch of handmade warmth to your holiday decor with this charming tiered crochet Christmas tree ornament. Designed to be a striking focal point on your tree, this project features a delightful layered cone shape made of six distinct, overlapping tiers. The color palette alternates beautifully between deep crimson red, rich forest green, and classic cream, giving it a nostalgic, rustic cabin aesthetic. Whether you are creating a set of ornaments for your own home, whipping up quick gifts for teachers and neighbors, or preparing stock for a holiday craft market, this pattern is as enjoyable to crochet as it is to display.
One of the most appealing aspects of this design is its rich texture and thoughtful embellishments. The ornament is crowned with a simple yellow crochet star and finished at the base with a brown tree trunk. A functional gold jingle bell hangs from the bottom, adding a festive auditory element whenever the tree branches sway. Adorned with rustic jute twine bows at both the top and bottom, along with a column of alternating colored buttons down the center, the finished piece looks incredibly polished.
Because amigurumi allows for endless personalization, you can easily adapt this crochet Christmas tree ornament pattern to match your specific holiday theme. Swap the classic red and green for icy blues and silvers, or replace the central buttons with beads, sequins, or miniature embroidered baubles. The combination of simple stitches, clever back-loop construction, and festive add-ons makes this a highly rewarding holiday crochet pattern that you will return to year after year.
🔍 C. MAIN PATTERN OVERVIEW
This amigurumi tree is constructed using a clever, seamless top-down method. Instead of crocheting six separate cones and sewing them together, you will crochet a single continuous cone. The overlapping tiered effect is achieved by working a scalloped flounce into the front loops of specific rounds. Once a flounce is completed, you will join your new color to the unworked back loops behind the flounce to continue the structural base of the cone.
The project is completed with a few simple attachments. A flat circular base is crocheted separately and sewn to the bottom of the cone to contain the stuffing and provide a flat surface. The square-shaped brown trunk is crocheted from the bottom up and sewn to this base. Finally, the five-pointed yellow star is worked in a single round and attached to the very top. Embellishments like the buttons, bows, bell, and hanging loop are added at the very end to bring the character of the tree to life.
🎯 D. SKILL LEVEL
Intermediate
While the stitches used are basic, the construction requires an understanding of working in front and back loops, changing colors cleanly, and managing multiple components.
Techniques Involved:
- Working in continuous and joined rounds
- Magic Ring (MR)
- Single crochet increases
- Working in Front Loops Only (FLO) and Back Loops Only (BLO)
- Clean color changes
- Basic amigurumi stuffing and sewing assembly
- Attaching hardware (buttons and bells)
📏 E. FINISHED SIZE
When made with worsted weight (Category 4) yarn and a 3.5mm hook, the finished tree ornament measures approximately:
- Height: 6.5 inches (16.5 cm) from the tip of the star to the bottom of the bell.
- Width: 4.5 inches (11.5 cm) across the widest bottom tier.
Size adjustments: The final size will vary depending on your chosen yarn weight, hook size, and personal tension. Using a chunky chenille yarn and a 5.0mm hook will result in a much larger plush tree, while sport weight cotton and a 2.5mm hook will yield a petite, miniature ornament.
🧮 F. GAUGE
- Gauge: 5 sc stitches and 5 rounds = 1 inch (2.5 cm).
- Note: Exact gauge is not critical for this ornamental project. However, tight, consistent stitches are essential for amigurumi to ensure the fiberfill stuffing does not show through the gaps. If you tend to crochet loosely, consider dropping down half a hook size.
🧶 G. REQUIRED YARN AMOUNTS
This project is an excellent stash-buster. All estimates are for worsted weight (Category 4) yarn.
- 🔴 Color A (Crimson Red): Approximately 25 yards (Tiers 1 and 5).
- ⚪ Color B (Cream/White): Approximately 35 yards (Tiers 2, 4, 6, and bottom closure).
- 🟢 Color C (Forest Green): Approximately 20 yards (Tier 3).
- 🟤 Color D (Chocolate Brown): Approximately 10 yards (Trunk).
- 🟡 Color E (Mustard Yellow): Approximately 5 yards (Star).
🧰 H. MATERIALS
- Hook: 3.5mm (US E-4) crochet hook.
- Yarn: Worsted weight acrylic or cotton yarn in the five colors listed above.
- Stuffing: High-quality polyester fiberfill.
- Buttons: Three 12mm cream buttons and three 12mm red buttons.
- Hardware: One small (approx. 15mm) gold jingle bell.
- Cordage: Thin jute twine for the decorative bows.
- Hanger: Red and white striped baker’s twine for the hanging loop.
- Tools: Tapestry needle, scissors, stitch markers, and sewing pins.
- ⚠️ Safety Note: This pattern includes small parts (buttons and a bell) that pose a choking hazard. If modifying this item for a baby or toddler, embroider the buttons using french knots and omit the metal bell.
🔤 I. ABBREVIATIONS – US TERMS
- MR – Magic Ring
- ch – chain
- sc – single crochet
- hdc – half double crochet
- inc – single crochet increase (2 sc in the same stitch)
- dec – single crochet decrease (invisible decrease recommended)
- sl st – slip stitch
- st(s) – stitch(es)
- FLO – Front Loops Only
- BLO – Back Loops Only
- ( … ) x N – repeat the instructions inside the parentheses N times
- [ … ] – all stitches inside the brackets are worked into the same, single stitch
📝 J. NOTES BEFORE YOU BEGIN
- Continuous Rounds: The main structural base of the tree is worked in continuous spiral rounds. Do not slip stitch or chain 1 at the end of these rounds unless explicitly stated. Use a stitch marker to mark the first stitch of every round.
- Flounce Rounds: The scalloped flounce rounds (the textured edge of each tier) are worked in joined rounds.
- Color Changes: To achieve the cleanest color transition, perform the color change during the last step of the stitch prior to the new color. When completing the final slip stitch of a flounce, cut the yarn and weave in the end. Join the new color in the specified back loop with a standing single crochet.
- Stuffing: Stuff the cone firmly as you go, particularly before attaching the bottom closure plate. A firmly stuffed cone will maintain its shape and allow the overlapping tiers to pop.
🪡 K. COMPLETE PATTERN
🌲 The Tree Cone (Worked Top-Down)
This section creates the entire tiered body of the tree, starting at the top red tip and working downward to the final cream tier.
Tier 1: Red
Using Color A (Crimson Red).
R1: MR 6. (6 sts)
R2: inc in each st around. (12 sts)
R3: (1 sc, inc) x 6. (18 sts)
R4: sc in each st around. (18 sts)
R5 (Red Flounce): Working in FLO, [(1 sc, 2 hdc, 1 sc) all in the next st, skip 1 st] x 9. Fasten off Color A and weave in the end. (9 scallops created)
Tier 2: Cream
Join Color B (Cream) in the first unworked BLO from R4 (located behind the red flounce).
R6: Working in BLO of R4, sc in each st around. (18 sts)
R7: (2 sc, inc) x 6. (24 sts)
R8: sc in each st around. (24 sts)
R9 (Cream Flounce): Working in FLO, [(1 sc, 2 hdc, 1 sc) all in the next st, skip 1 st] x 12. Fasten off Color B and weave in the end. (12 scallops created)
Tier 3: Green
Join Color C (Green) in the first unworked BLO from R8 (located behind the cream flounce).
R10: Working in BLO of R8, sc in each st around. (24 sts)
R11: (3 sc, inc) x 6. (30 sts)
R12: sc in each st around. (30 sts)
R13 (Green Flounce): Working in FLO, [(1 sc, 2 hdc, 1 sc) all in the next st, skip 1 st] x 15. Fasten off Color C and weave in the end. (15 scallops created)
Tier 4: Cream
Join Color B (Cream) in the first unworked BLO from R12.
R14: Working in BLO of R12, sc in each st around. (30 sts)
R15: (4 sc, inc) x 6. (36 sts)
R16: sc in each st around. (36 sts)
R17 (Cream Flounce): Working in FLO, [(1 sc, 2 hdc, 1 sc) all in the next st, skip 1 st] x 18. Fasten off Color B and weave in the end. (18 scallops created)
Tier 5: Red
Join Color A (Crimson Red) in the first unworked BLO from R16.
R18: Working in BLO of R16, sc in each st around. (36 sts)
R19: (5 sc, inc) x 6. (42 sts)
R20: sc in each st around. (42 sts)
R21 (Red Flounce): Working in FLO, [(1 sc, 2 hdc, 1 sc) all in the next st, skip 1 st] x 21. Fasten off Color A and weave in the end. (21 scallops created)
Tier 6: Cream
Join Color B (Cream) in the first unworked BLO from R20.
R22: Working in BLO of R20, sc in each st around. (42 sts)
R23: (6 sc, inc) x 6. (48 sts)
R24: sc in each st around. (48 sts)
R25 (Final Cream Flounce): Working in FLO, [(1 sc, 2 hdc, 1 sc) all in the next st, skip 1 st] x 24. Fasten off Color B and weave in the end. (24 scallops created)
🛑 Bottom Closure Base
This piece seals the bottom of the tree so the stuffing does not fall out.
Using Color B (Cream).
R1: MR 6. (6 sts)
R2: inc in each st around. (12 sts)
R3: (1 sc, inc) x 6. (18 sts)
R4: (2 sc, inc) x 6. (24 sts)
R5: (3 sc, inc) x 6. (30 sts)
R6: (4 sc, inc) x 6. (36 sts)
R7: (5 sc, inc) x 6. (42 sts)
R8: (6 sc, inc) x 6. (48 sts)
Sl st into the next st to finish. Fasten off, leaving an extra-long yarn tail (about 20 inches) for sewing the base to the tree.
🪵 Tree Trunk
The trunk is attached to the bottom of the ornament.
Using Color D (Chocolate Brown).
R1: MR 8. (8 sts)
R2: inc in each st around. (16 sts)
R3: Working in BLO, sc in each st around. (16 sts)
R4-6: sc in each st around for 3 rounds. (16 sts)
Sl st into the next st to finish. Fasten off, leaving a long tail for sewing. Lightly stuff the trunk.
⭐ Top Star
A simple five-pointed star to sit at the pinnacle of the tree.
Using Color E (Mustard Yellow).
R1: In a Magic Ring, work (1 sc, ch 2, sl st into the 2nd ch from the hook, sl st back into the MR) x 5.
Pull the magic ring tight to close the center of the star. Fasten off, leaving a long tail for sewing.
🎨 L. STYLING / ASSEMBLY / STABILITY / FINAL SHAPING
The magic of this ornament relies on careful, symmetrical assembly. Follow these steps in order to ensure your tree looks perfectly balanced.
- Stuffing the Cone: Begin stuffing the main tree cone firmly. Ensure the point at the top is adequately filled so it doesn’t collapse under the weight of the star.
- Attaching the Base: Thread the long cream tail from the Bottom Closure Base onto your tapestry needle. Align the base with the unworked Back Loops of R24 (behind the final cream flounce). Sew the base to the tree using a whip stitch. Stop when you have about 2 inches left unsewn, add any final stuffing to ensure the bottom is flat and firm, then sew completely closed. Weave in the end.
- Attaching the Trunk: Pin the stuffed brown trunk directly to the center of the bottom base. Sew it securely in place using the brown yarn tail.
- Adding the Bell: Using a thin piece of yarn or sturdy sewing thread, securely sew the gold jingle bell to the bottom center of the brown trunk.
- Attaching the Star: Position the yellow star at the very top of the red tier. Sew it in place so that the star stands vertically and faces forward.
- Sewing the Buttons: Down the front center of the tree, sew one button onto each of the six tiers. Alternate the colors: place a cream button on the red and green tiers, and a red button on the cream tiers. Ensure they form a perfectly straight vertical line.
- Tying the Bows: Cut two lengths of jute twine. Tie one into a small, neat bow and sew or glue it horizontally across the middle of the brown trunk. Tie the second piece into a slightly larger bow and attach it to the front tip of the tree, sitting directly below the hanger and just above/behind the star.
- Adding the Hanger: Thread a piece of red and white striped baker’s twine through the very top stitches of the red cone (behind the star). Knot the ends together at the top to create a hanging loop.
- ✅ Final Shaping Check: Roll the stuffed tree gently between your hands to distribute the stuffing evenly. Flip all the scalloped flounces downward so they lay flat against the tier below them. Ensure the line of buttons aligns perfectly with the center of the star above and the trunk below.
💡 M. HELPFUL CROCHET TIPS
- 💡 Flounce Alignment: When working the scalloped flounce rounds, check periodically to ensure they are laying flat and not ruffling too tightly. The (1 sc, 2 hdc, 1 sc) cluster provides just enough width to create a gentle, bubbly scallop without extreme rippling.
- 💡 Hiding Color Changes: Make sure the “seam” where your round transitions and color changes occur is positioned at the back of the tree. When you sew on your buttons, deliberately place them on the exact opposite side of this seam.
- 💡 Button Security: If you are hanging this on a real tree where pets or children might tug at it, sew the buttons on using heavy-duty upholstery thread or dental floss rather than yarn, as it provides a much more secure anchor.
- 💡 Crisp Edges: When crocheting the BLO round for the trunk (R3), keep your tension slightly tighter than usual. This helps create a sharp, distinct 90-degree angle for the base of the trunk.
- 💡 Stuffing Consistency: Do not overstuff the very bottom of the cone right before adding the base plate, otherwise, the base will bulge outward, and the trunk will not sit straight. The bottom should be relatively flat.
- 💡 Twine Fraying: To prevent your jute twine bows from unraveling over the years, apply a tiny, invisible dab of clear fabric glue or clear nail polish to the cut ends of the twine.
🧼 N. CARE INSTRUCTIONS
Because this ornament utilizes mixed materials (yarn, wooden/plastic buttons, metal bell, and jute twine), it should never be machine washed.
- Dusting: Lightly run a clean, dry makeup brush or a lint roller over the tiers to remove seasonal dust before packing it away.
- Spot Cleaning: If the yarn becomes soiled, gently dab the affected area with a damp cloth and a drop of mild baby shampoo. Do not soak the ornament, as the metal bell may rust and the inner fiberfill can take too long to dry, leading to mildew.
- Storage: Store the ornament in a rigid box rather than a soft bag to prevent the star from being crushed or the cone from losing its shape under heavier decorations.
❓ R. FAQ
❓ Can I make this tree ornament larger?
Yes! The easiest way to scale up this pattern is to use thicker yarn. Try a bulky or super bulky velvet/chenille yarn with a 5.0mm or 6.0mm hook. The pattern instructions remain exactly the same, but you will end up with a large, plush standalone tree rather than a hanging ornament.
❓ Can I use cotton yarn instead of acrylic?
Absolutely. Cotton yarn is excellent for amigurumi because it offers fantastic stitch definition and minimal halo (fuzziness). It will make the scalloped edges of the tiers look incredibly crisp. Just be aware that cotton has less stretch, so your hands might tire a bit faster.
❓ Why are my flounces curling upward?
If your scalloped flounces are flipping up instead of laying down, your tension on the FLO round is likely too tight. Try going up half a hook size only for the flounce rounds, and make sure to gently block or pull the flounces downward with your fingers once the tree is fully stuffed.
❓ Is this pattern safe for babies or toddlers to play with?
As written, no. The buttons and the metal bell are choking hazards. To adapt this into a safe soft toy, omit the bell completely, embroider french knots in place of the buttons, and ensure the star is securely stitched down on all five points.
❓ Can I add more tiers to make the tree taller?
Yes, you can extend the pattern mathematics. The base cone increases by 6 stitches every other round. To add a 7th tier, you would work a BLO round of (7 sc, inc) x 6 = 54 sts, followed by a round of plain sc, and then a flounce round of [(1 sc, 2 hdc, 1 sc), skip 1] x 27. You will also need to increase the bottom closure base by one additional round to match the 54 stitches.