
Why This Peanut Butter Icebox Cake Recipe Works
This Peanut Butter Icebox Cake stands out due to its creamy, rich filling that perfectly complements the crunchy texture of the chocolate wafers. The no-bake aspect makes it a breeze to prepare, especially during warmer months. The combination of peanut butter and chocolate is a classic favorite, appealing to both kids and adults alike.
Using heavy whipping cream ensures a light and fluffy texture, while the layers of cookies soak up the creaminess, creating a delectable contrast. The simple ingredients and easy preparation make this dessert a winner for any occasion.
💡 Professional Tip
For the best texture, chill the cake overnight. This allows the flavors to meld beautifully and the cookies to soften perfectly. If you're looking for an added crunch, consider adding crushed graham crackers or nuts in between the layers.
Frequently Asked Questions
Yes, you can make Peanut Butter Icebox Cake ahead of time. In fact, it’s best when made a day in advance to allow the flavors to develop and the cookies to soften. Just cover it well with plastic wrap and keep it in the refrigerator until you're ready to serve.
If you can't find chocolate wafer cookies, you can substitute them with graham crackers or vanilla wafers. Keep in mind that this will slightly change the flavor, but it will still create a delicious icebox cake. Just dip them in milk before layering.
Since this is a no-bake cake, it’s done when it has been adequately chilled in the refrigerator. The cake should hold its shape when cut and the filling should be set. Ideally, let it chill for at least 4 hours, but overnight is best.
Yes, you can freeze Peanut Butter Icebox Cake! Just cover it tightly with plastic wrap and then foil to prevent freezer burn. It can be frozen for up to a month. To serve, let it thaw in the refrigerator overnight before enjoying.
Peanut Butter Icebox Cake pairs well with a scoop of vanilla ice cream or a dollop of whipped cream. Fresh berries also make a lovely accompaniment, adding a tart contrast to the rich flavors of the cake.
In the refrigerator, Peanut Butter Icebox Cake will last for about 3 to 4 days. Be sure to keep it covered to maintain its freshness. After a few days, the texture may alter as the cookies become softer.
Absolutely! Making Peanut Butter Icebox Cake in advance is highly recommended for the best flavor. It allows the layers to set properly and gives the cake a more cohesive flavor profile. Just prepare it a day ahead and refrigerate until serving.
Since Peanut Butter Icebox Cake is best served chilled or at room temperature, there's no need to reheat it. If you prefer it slightly softer, let it sit at room temperature for about 15-20 minutes before serving.
Not Crispy Enough
Problem: The cookies may have lost their crunch.
Solution: To maintain a crispy texture, avoid over-soaking the cookies in milk. A quick dip is sufficient; too long will result in sogginess.
Overcooked
Problem: This issue doesn’t directly apply since it’s a no-bake recipe, but over-mixing the cream can lead to a grainy texture.
Prevention: Be careful not to overbeat the cream. Stop mixing as soon as stiff peaks form to maintain a light and fluffy texture.
Undercooked Center
Problem: This issue is not applicable as the recipe doesn't involve cooking.
Recovery: Ensure the cake is chilled for the recommended time. If the center feels soft, give it more time in the fridge before serving.
Burnt Exterior
Problem: This issue does not apply since the recipe is a no-bake cake.
Prevention: Avoid any baking methods for this recipe, as it is intended to be chilled and served cold.
Flavor Balance
Too Sweet: If the cake is too sweet, consider reducing the amount of powdered sugar in the cream mixture next time.
Too Salty: If the cake tastes too salty, ensure that you use unsalted butter and check that the salt used is measured accurately.
Bland: For a richer flavor, add a pinch more salt or some extra vanilla extract to enhance the overall taste.
Essential Ingredients for Peanut Butter Icebox Cake
The key ingredients for Peanut Butter Icebox Cake include creamy peanut butter, heavy whipping cream, and chocolate wafer cookies. Each plays a crucial role in achieving the cake's signature texture and flavor. The peanut butter provides that rich, nutty taste, while the heavy cream adds lightness and creaminess.
Quality matters for all ingredients. Opt for natural peanut butter without added sugars for a more authentic flavor. The freshness of the heavy cream also impacts the overall taste, so choose a good brand. The chocolate wafers should be crisp to create the ideal texture contrast with the creamy filling.
Essential Ingredient Notes
- Creamy Peanut Butter: Use creamy peanut butter for a smooth texture that integrates well into the cream mixture. Natural peanut butter is a great option as it has fewer additives and retains a rich flavor.
- Heavy Whipping Cream: Ensure your heavy whipping cream is chilled before whipping it to achieve maximum volume and a light texture. Using fresh cream will enhance the cake's overall taste.
- Chocolate Wafer Cookies: Select high-quality chocolate wafer cookies for the best results. They should be crisp and not stale, as this will affect the cake's texture and flavor.
Step-by-Step Cooking Process
Making Peanut Butter Icebox Cake is straightforward and requires no baking. The process begins by preparing the cream mixture, then layering it with the soaked chocolate wafer cookies. Each layer builds a delightful medley of flavors and textures.
For perfect results, ensure each layer is even and well-distributed. Allowing the cake to chill thoroughly lets the flavors meld beautifully, creating a harmonious dessert that is sure to please.
Key Technique for Perfect Peanut Butter Icebox Cake
The essential technique for this cake is properly whipping the cream to stiff peaks. This ensures the filling is light and airy, which balances the creamy peanut butter. Additionally, layering the cookies with just the right amount of milk keeps them from becoming too soggy without losing their crunch.
Peanut Butter Icebox Cake
📋 Ingredients
Main Ingredients
- 1 cup butterRoom temperature
- 1 cup peanut butterCreamy
- 1/2 cup sugarGranulated
- 1/2 cup cocoa powderUnsweetened
- 1/4 cup milkFor soaking
For the Sauce
- 2 cups heavy whipping creamChilled
- 1 cup creamy peanut butterSmooth
- 1/2 cup powdered sugarFor sweetness
- 1 teaspoon vanilla extractPure
- 1 box chocolate wafer cookiesFor layering
- 1/4 cup milkFor soaking cookies
- 1/2 cup chocolate chipsFor topping
- 1/4 cup chopped peanutsFor garnish
Instructions
Prepare the Cream Mixture
In a large bowl, combine the heavy whipping cream, peanut butter, powdered sugar, and vanilla extract. Beat with an electric mixer until stiff peaks form.
Layer the Cookies
Dip each chocolate wafer cookie in milk briefly and layer them in a 9x13 inch baking dish.
Spread the Cream
Spread a layer of the peanut butter cream mixture over the cookies, and repeat the layers until ingredients are used up.
Add Toppings
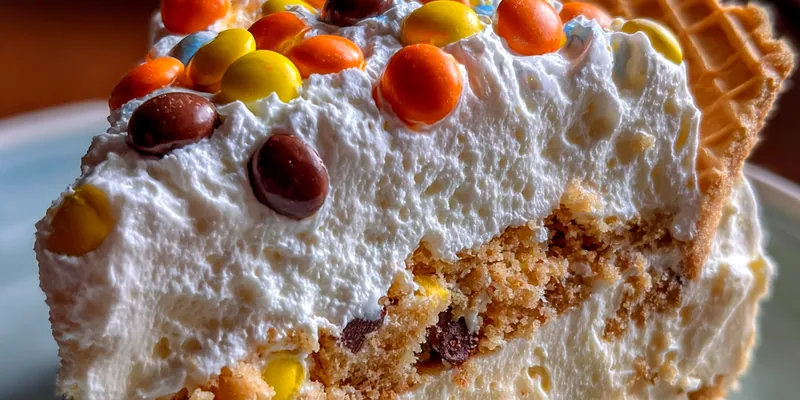
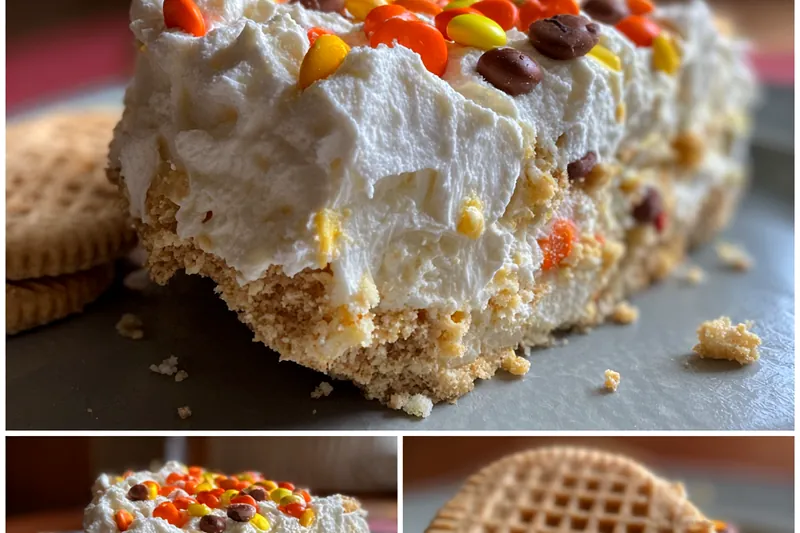
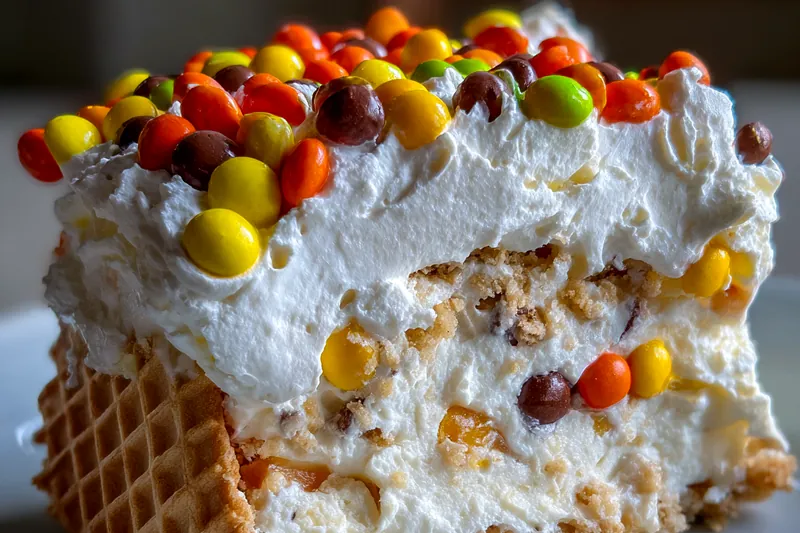
Top the final layer of cream with chocolate chips and chopped peanuts.
Chill the Cake
Cover the dish with plastic wrap and refrigerate for at least 4 hours, or overnight for best results.
Serve
Slice the cake and serve chilled. Enjoy your delicious Peanut Butter Icebox Cake!
Garnish if Desired
Garnish with additional whipped cream or chocolate drizzle before serving, if desired.
Storage
Store any leftover cake in the refrigerator for up to 3 days.
Recipe Notes & Tips
Storage Tips
To keep your Peanut Butter Icebox Cake fresh, store it in an airtight container in the refrigerator. It can last up to 3 days. If you need to keep it longer, consider freezing it, but be sure to wrap it tightly.
Serving Suggestions
For a wonderful presentation, serve Peanut Butter Icebox Cake topped with whipped cream and a drizzle of chocolate. Fresh fruits like strawberries or raspberries can add a refreshing contrast.
Recipe Variations
You can customize this Peanut Butter Icebox Cake by adding layers of banana slices, using almond butter instead of peanut butter, or even incorporating a layer of chocolate ganache for extra richness.