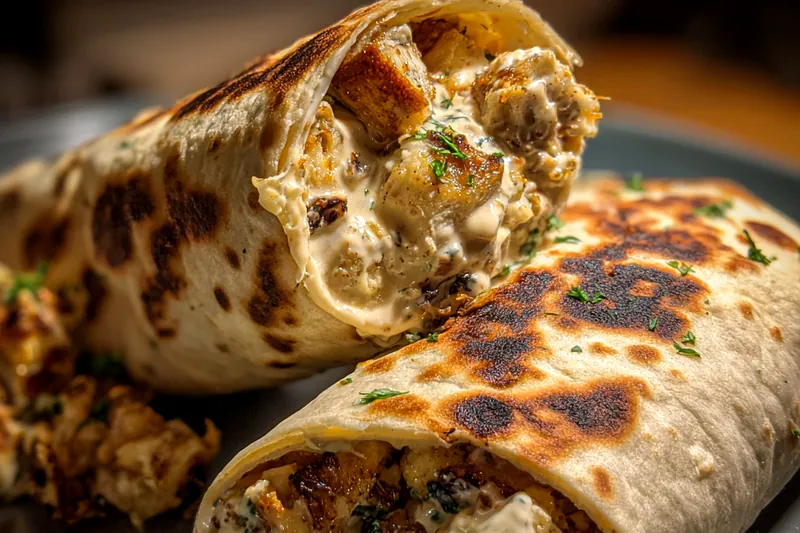
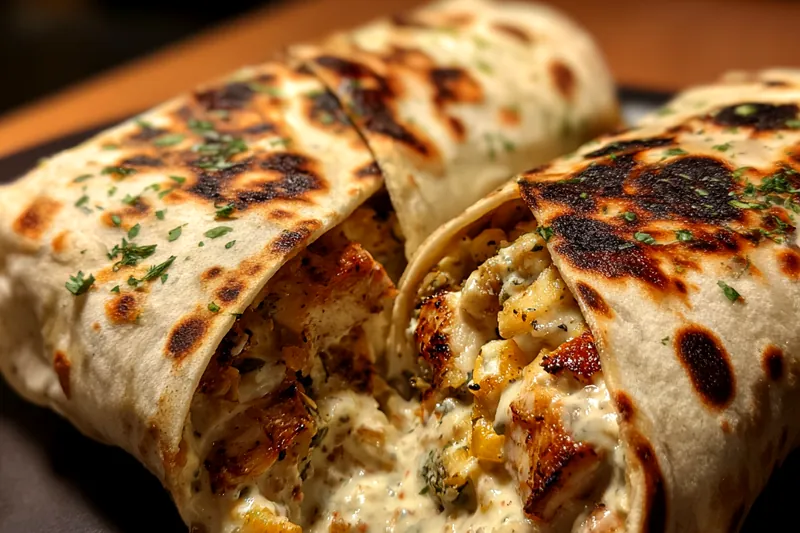
Creamy Garlic Chicken Wraps
Creamy Garlic Chicken Wraps are a delightful lunch option that combines tender chicken with a rich garlic cream sauce, all wrapped up in a soft tortilla. This recipe is not only easy to prepare but also packed with flavors that will leave you wanting more. Perfect for meal prep or a quick weeknight dinner, these wraps can be customized to suit your taste. Get ready to impress your family and friends with this irresistible dish!


Why This Creamy Garlic Chicken Wraps Recipe Works
This recipe stands out because of its rich, creamy garlic sauce that perfectly complements the tender chicken. The combination of fresh ingredients like lettuce and tomatoes adds a refreshing crunch. Plus, the option to customize with your favorite toppings makes it versatile for any palate.
The key to achieving the best results lies in cooking the chicken thoroughly and allowing the sauce to simmer, which enhances the flavors. The creamy texture ensures each bite is satisfying and indulgent while remaining balanced with the freshness of herbs and veggies.
💡 Professional Tip
For the best results, ensure your chicken is cooked evenly by cutting it into uniform pieces. This allows for consistent cooking and ensures that the chicken absorbs the creamy garlic sauce fully. Additionally, letting the sauce simmer will deepen the flavors, creating a more robust dish.
Frequently Asked Questions
Yes, you can prepare the creamy garlic chicken mixture ahead of time and store it in the refrigerator for up to 2 days. Just assemble the wraps when you're ready to serve. This makes it a great option for meal prep or quick weeknight dinners.
If you're looking for a lighter option, you can substitute heavy cream with half-and-half or whole milk mixed with a little cornstarch for thickness. Alternatively, you can use coconut cream for a dairy-free version, though it will impart a slight coconut flavor.
The wraps are done when the chicken is cooked through and reaches an internal temperature of 165°F. The sauce should be bubbly and slightly thickened. If using tortillas, ensure they are warm and pliable before serving.
Yes, you can freeze the prepared wraps, but it's best to freeze the filling separately. Assemble the wraps after thawing to maintain the tortilla's texture. The filling can be frozen for up to 3 months.
These wraps pair beautifully with a side salad or freshly cut veggies for a light meal. You can also serve them with dipping sauces like ranch or a spicy aioli for extra flavor. For a heartier option, consider serving with potato wedges or a grain side.
The wraps can last in the refrigerator for up to 3 days. To keep them fresh, store them in an airtight container. However, for best flavor and texture, it's recommended to consume them within the first day or two.
Absolutely! You can prepare the chicken and sauce a day in advance and store them separately. Assemble the wraps just before serving to ensure they remain fresh and the tortillas don’t get soggy.
To reheat the wraps, place them in the microwave for about 30-45 seconds until warmed through. Alternatively, you can heat them in an oven set to 350°F for about 10 minutes, which will help keep the tortillas crispy.
Recipe Troubleshooting Guide
Too Dry
Problem: The wraps turn out dry and lacking moisture.
Solution: Ensure you use enough sauce when assembling the wraps. Adding a bit of extra cream or broth can help keep them moist.
Not Crispy Enough
Problem: The wraps do not have a desirable crispy texture.
Solution: To achieve more crispiness, lightly grill the wraps on a skillet after assembling, or bake them in the oven for a few minutes until they are golden brown.
Overcooked
Problem: The chicken is tough or dry from overcooking.
Prevention: To prevent overcooking, monitor the cooking time closely and use a meat thermometer to ensure the chicken reaches the correct internal temperature without going beyond.
Undercooked Center
Problem: The chicken in the wraps is undercooked and raw in the middle.
Recovery: If you suspect undercooked chicken, return the wraps to the skillet or oven for a few more minutes until fully cooked, ensuring it reaches 165°F.
Burnt Exterior
Problem: The outer tortilla is burnt while the inside remains uncooked.
Prevention: Lower the heat when cooking the wraps and flip them more frequently to ensure even cooking without burning.
Flavor Balance
Too Sweet: If the dish is too sweet, add a pinch of salt or a splash of vinegar to balance the flavors.
Too Salty: To fix overly salty wraps, add a bit of sugar or additional fresh ingredients to dilute the saltiness.
Bland: If the flavor is bland, enhance it with more seasoning, fresh herbs, or a squeeze of lemon juice to brighten the taste.
Essential Ingredients for Creamy Garlic Chicken Wraps
The main ingredients for these wraps include tender chicken breast, which provides a protein-packed base. The creamy garlic sauce made from butter, heavy cream, and garlic creates a rich flavor profile. Fresh toppings like lettuce and tomatoes not only add crunch but also enhance the nutritional value of the dish.
Quality ingredients are key to achieving the best results. Using fresh, organic vegetables and high-quality chicken will elevate the flavor and texture of your wraps. It's also essential to use real butter and cream, as they contribute to the creaminess and richness of the sauce.
Essential Ingredient Notes
- Chicken Breast: Choose skinless, boneless chicken breasts for lean protein. Ensure they are fresh and not frozen for better flavor and texture. Cutting the chicken into uniform pieces will also help it cook evenly.
- Garlic: Use fresh garlic for the best flavor. Crushing the garlic just before cooking will release its oils and enhance its aroma. You can adjust the amount of garlic to suit your taste preferences.
- Heavy Cream: Heavy cream is essential for creating a rich, velvety sauce. Make sure it's at room temperature before adding it to the skillet to prevent curdling. For a lighter version, opt for half-and-half or a milk alternative.
Step-by-Step Cooking Process
The cooking process for creamy garlic chicken wraps is straightforward and beginner-friendly. Start by cooking the chicken until golden brown, then add garlic and let it sauté for a few minutes. The key is to keep the heat controlled to enhance the flavors without burning the garlic.
Once the chicken is cooked, the addition of heavy cream transforms the dish into a comforting, creamy delight. Stirring well ensures that every bite is flavorful, and allowing it to simmer gives the sauce a chance to thicken and absorb the garlic's essence.
Key Technique for Perfect Creamy Garlic Chicken Wraps
The most important technique in making creamy garlic chicken wraps is achieving the right balance of heat. Cooking the chicken on medium heat allows it to brown without burning, while simmering the sauce on low heat ensures it thickens nicely without separating. Stirring frequently helps to incorporate all flavors evenly.
Creamy Garlic Chicken Wraps
📋 Ingredients
Main Ingredients
- 1 cup butterRoom temperature
- 1 cup heavy creamRoom temperature
- 1/4 cup garlicMinced
- 1 teaspoon saltTo taste
- 1/2 teaspoon black pepperTo taste
- 1 tablespoon Italian seasoningDried
For the Sauce
- 2 lbs chickenCut into pieces
- 1 cup shredded lettuceFresh
- 1 cup diced tomatoesFresh
- 1/2 cup shredded cheeseCheddar or mozzarella
- 6 large tortillasFlour or whole wheat
- 1/4 cup fresh parsleyChopped
Instructions
Prepare Ingredients
Gather all the ingredients needed for the wraps, ensuring everything is at hand for a smooth cooking process.
Cook Chicken
In a large skillet over medium heat, melt the butter and add the chicken pieces. Cook until the chicken is no longer pink inside, about 20 minutes.
Add Garlic
Stir in the minced garlic and cook for an additional 2-3 minutes until fragrant.
Make the Sauce
Reduce the heat to low and add the heavy cream, salt, pepper, and Italian seasoning. Stir well and let it simmer for about 5 minutes.
Assemble Wraps
Lay the tortillas flat and spoon the creamy garlic chicken mixture onto the center of each tortilla.
Add Toppings
Top with shredded lettuce, diced tomatoes, and cheese, then fold the sides of the tortilla over the filling and roll tightly.
Serve
Cut the wraps in half and serve them warm, garnished with fresh parsley.
Enjoy
Dig into these delicious creamy garlic chicken wraps for a satisfying lunch or dinner!
Recipe Notes & Tips
Storage Tips
Store any leftover creamy garlic chicken wraps in an airtight container in the refrigerator for up to 3 days. To keep the tortillas from becoming soggy, you can store the filling separately and assemble the wraps just before eating.
Serving Suggestions
Creamy garlic chicken wraps can be served with a side of crispy potato wedges or a fresh garden salad. For an extra kick, try pairing them with a spicy dipping sauce or homemade salsa.
Recipe Variations
Feel free to customize these wraps by adding your favorite vegetables like bell peppers or avocado. You can also swap the chicken for grilled shrimp or tofu for a different protein option.