Cheesy Garlic Butter Bombs
Cheesy Garlic Butter Bombs are the ultimate appetizer that will leave your guests craving more. These bite-sized treats are filled with gooey cheese and infused with aromatic garlic butter. Perfect for parties, game days, or a cozy night in, this recipe is sure to impress. Get ready to experience a flavor explosion with every bite!

Why This Cheesy Garlic Butter Bombs Recipe Works
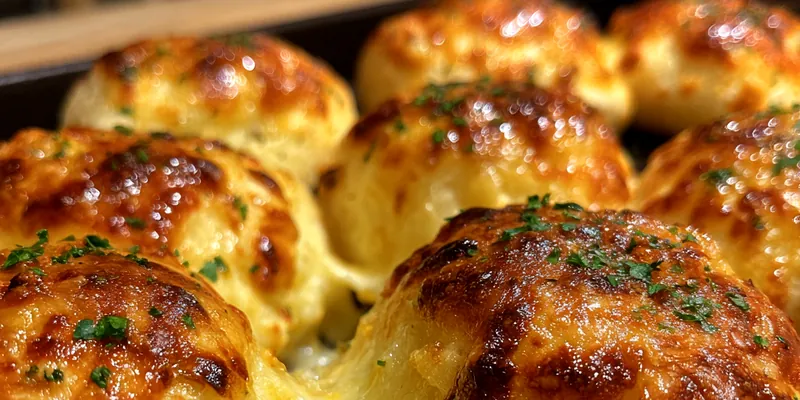
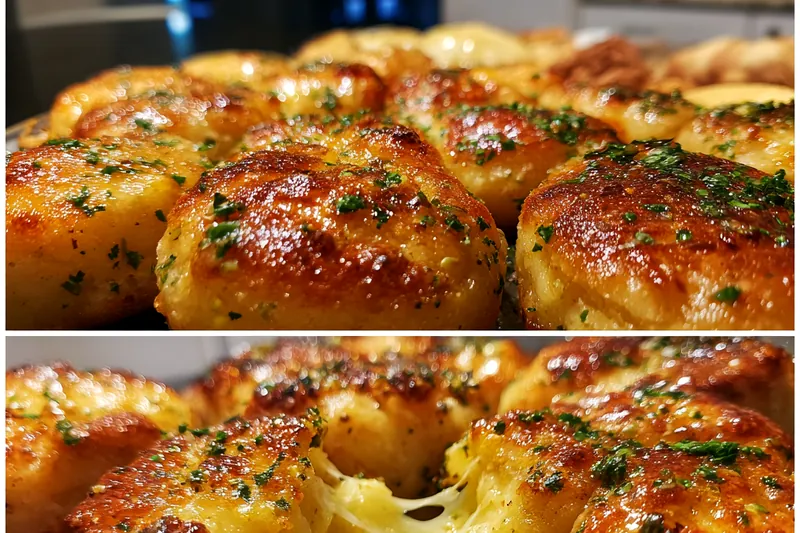
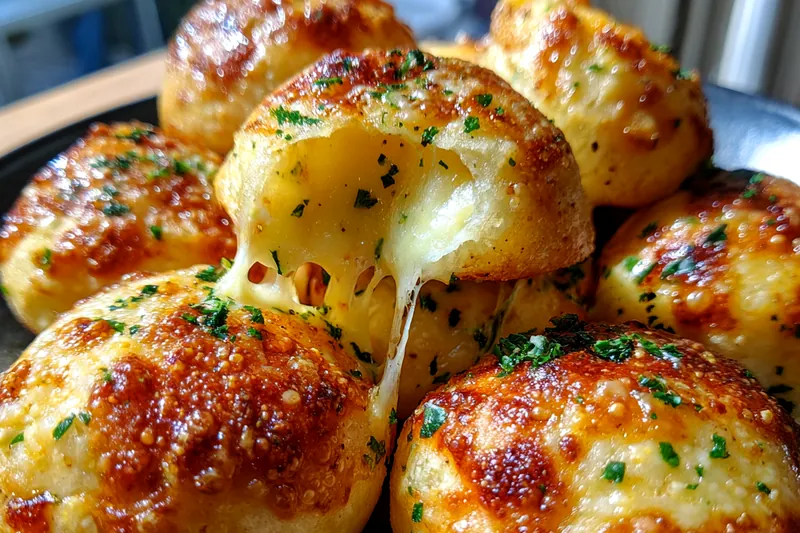
These Cheesy Garlic Butter Bombs combine the best of both worlds: buttery dough and melted cheese. The blend of mozzarella and Parmesan ensures a rich, creamy center that bursts with flavor. Additionally, the garlic butter adds an aromatic touch that elevates the overall taste. Each bite is a delightful explosion of cheesy goodness!
The technique of sealing the dough tightly around the cheese is crucial to achieving a perfectly melty inside. Baking them until golden not only enhances flavor but also gives a beautiful visual appeal. The garlic butter coating contributes to a crispy exterior, making these bombs a textural delight. It's a simple recipe that delivers impressive results.
💡 Professional Tip
For extra flavor, consider adding some chopped fresh herbs like basil or thyme to the cheese filling. Also, make sure your dough is rolled out evenly to create uniform bombs. If you're feeling adventurous, experiment with different cheeses or even add some cooked bacon bits for a savory twist.
Frequently Asked Questions
Yes, you can prepare the dough balls in advance and store them in the refrigerator for up to 24 hours. Just make sure to coat them in the garlic butter mixture before baking. If you prefer, you can also freeze them before baking. Just thaw them in the fridge overnight before baking.
If you don't have mozzarella cheese, you can substitute it with provolone, cheddar, or even a blend of your favorite cheeses. Each will impart a different flavor and texture, but they all work beautifully in this recipe.
Your Cheesy Garlic Butter Bombs are done when they are golden brown on top and the dough is cooked through. You can check the center by gently squeezing one of the bombs; it should feel firm and not doughy. The aroma of baked garlic and cheese will also fill your kitchen!
Absolutely! You can freeze the unbaked Cheesy Garlic Butter Bombs. Just place them on a baking sheet to freeze individually, then transfer them to an airtight container. When you're ready to enjoy them, bake straight from frozen, adding an extra 5-10 minutes to the baking time.
These buttery bombs pair well with marinara sauce or ranch dressing for dipping. You can also serve them alongside a fresh salad or as part of a larger appetizer platter with veggies and other finger foods. They make a great addition to any game day spread or party table!
Cheesy Garlic Butter Bombs can be stored in the fridge for up to 3 days. Make sure they are placed in an airtight container to maintain their freshness. Reheat them in the oven or microwave before serving to restore their gooey texture.
Yes! You can prepare the filling and dough ahead of time. Just assemble the bombs and keep them covered in the fridge until you're ready to bake. This makes it easy to whip them up just before your guests arrive.
The best way to reheat Cheesy Garlic Butter Bombs is in the oven. Preheat the oven to 350°F (175°C), place the bombs on a baking sheet, and heat for about 10-15 minutes until warmed through. This will help maintain their crispy exterior and gooey interior.
Recipe Troubleshooting Guide
Too Dry
Problem: If your Cheesy Garlic Butter Bombs turn out too dry, it could be due to overbaking.
Solution: To prevent this, keep a close eye on the baking time and remove them once they are golden brown. You may also consider adding a bit more cheese to the filling for moisture.
Not Crispy Enough
Problem: If the bombs aren't crispy enough, it may be due to insufficient baking time or not enough butter.
Solution: Make sure you brush them generously with garlic butter before baking and check for doneness at the recommended time. You can also broil them for the last minute for added crispiness.
Overcooked
Problem: Overcooked Cheesy Garlic Butter Bombs can become hard and unappetizing.
Prevention: To prevent overcooking, follow the time closely and consider testing a bomb before the minimum baking time. If you find one overcooked, check your oven temperature as it may be too high.
Undercooked Center
Problem: If your bombs are undercooked in the center, they may feel doughy or heavy.
Recovery: To recover, return them to the oven and bake for additional time. You can cover them with foil to prevent further browning while ensuring the center cooks through.
Burnt Exterior
Problem: A burnt exterior can occur if the oven temperature is too high or if they are left in too long.
Prevention: To avoid this, always monitor the cooking time closely and consider using a lower temperature if your oven cooks unevenly. You can also rotate the pan halfway through baking.
Flavor Balance
Too Sweet: If your bombs are too sweet, add a pinch of salt to balance the flavors.
Too Salty: If they taste too salty, consider serving them with a fresh side salad to counterbalance the saltiness.
Bland: For bland bombs, enhance the flavor with additional herbs or spices like garlic powder or Italian seasoning.
Essential Ingredients for Cheesy Garlic Butter Bombs
The key to making perfect Cheesy Garlic Butter Bombs lies in using high-quality ingredients. Fresh pizza dough is essential for achieving that fluffy, soft texture. The blend of mozzarella and Parmesan not only provides a wonderful flavor but also ensures a gooey filling that everyone loves. Don't skimp on the garlic—it's crucial for that aromatic and savory finish.
Using unsalted butter for the garlic butter mixture allows you to control the seasoning better, while fresh herbs like parsley elevate the dish's flavor profile. Quality ingredients make a significant difference, so choose the best you can find for the best results.
Essential Ingredient Notes
- Pizza Dough: Opt for fresh pizza dough from your local pizzeria or grocery store for the best flavor and texture. If you're short on time, you can use refrigerated dough but let it rest before using.
- Cheese: Use a mix of mozzarella and Parmesan for optimal flavor and texture. Grate your own cheese for the best melt and freshness—pre-shredded cheese may contain anti-caking agents that affect melting.
- Garlic: Fresh garlic is key to achieving that fragrant flavor in the garlic butter mixture. Avoid using garlic powder, as it won't give you the same depth of flavor. Mince the garlic finely to ensure it's well distributed throughout the butter.
Step-by-Step Cooking Process
Making Cheesy Garlic Butter Bombs is a straightforward process that anyone can master. Start by preparing your ingredients and preheating the oven. The rolling out and filling of the dough balls is where the fun begins! Each ball should be filled generously with cheese, but make sure to seal it well to avoid any leaks during baking.
Once baked, the garlic butter transforms the dough into a golden, crispy exterior while keeping the insides nice and cheesy. Pay attention to the baking time for the best results—this will ensure you achieve that perfect balance of textures.
Key Technique for Perfect Cheesy Garlic Butter Bombs
The secret to achieving perfectly Cheesy Garlic Butter Bombs lies in the sealing technique. Ensure each dough ball is tightly sealed to keep the cheese from escaping during baking. This not only enhances the flavor but also ensures each bite is as cheesy as possible. Additionally, using a generous amount of garlic butter before baking will help create that irresistible golden crust.
Cheesy Garlic Butter Bombs
📋 Ingredients
Main Ingredients
- 1 cup butterRoom temperature
- 4 cloves garlicMinced
- 1 tsp dried oregano
- 1 tsp dried parsley
- 1/2 tsp salt
- 1/4 tsp black pepper
For the Sauce
- 1 lb pizza doughFresh or refrigerated
- 1 cup shredded mozzarella cheese
- 1/2 cup grated Parmesan cheese
- 1/4 cup unsalted butterMelted
- 1 eggBeaten
- 1/4 cup chopped fresh parsleyFor garnish
- 1/2 tsp red pepper flakesOptional
Instructions
Preheat Oven
Preheat your oven to 375°F (190°C).
Prepare Dough
Roll out the pizza dough on a lightly floured surface and cut it into squares, about 3 inches each.
Fill Dough
Place a tablespoon of mozzarella cheese and a teaspoon of Parmesan cheese in the center of each dough square.
Seal Dough
Fold the corners of the dough square over the cheese and pinch to seal tightly, forming a ball.
Prepare Garlic Butter
In a bowl, mix the melted butter, minced garlic, oregano, parsley, salt, and black pepper.
Coat Bombs
Dip each dough ball into the garlic butter mixture, ensuring they are well coated.
Arrange on Baking Sheet
Place the coated balls on a baking sheet lined with parchment paper, spacing them evenly.
Apply Egg Wash
Brush the tops of the dough balls with the beaten egg for a golden finish.
Bake
Bake in the preheated oven for 25-30 minutes, or until golden brown and cooked through.
Garnish and Serve
Remove from the oven, sprinkle with chopped parsley and red pepper flakes if using, and serve warm.
Recipe Notes & Tips
Storage Tips
Store Cheesy Garlic Butter Bombs in an airtight container in the refrigerator for up to 3 days. To maintain their texture, reheat them in the oven rather than the microwave. If you plan to store them long-term, consider freezing them before baking.
Serving Suggestions
Serve Cheesy Garlic Butter Bombs warm with marinara sauce or ranch dressing for dipping. They also pair well with a light salad or other finger foods for a complete appetizer spread.
Recipe Variations
For a twist, try adding cooked bacon, herbs, or different cheeses to the filling. You can also experiment with different seasonings in the garlic butter, such as adding a hint of lemon zest for freshness.