🧸 A. TITLE + CATEGORY/TAG LINE
Snowman Squad Crochet Pattern: 5 Cozy Winter Hats & 1 Adorable Face Motif
Category: Free Amigurumi & Crochet Decor Patterns | Tags: Holiday Ornaments, Winter Coasters, Amigurumi Snowman, Gift Accents, Christmas Crochet
📖 B. INTRODUCTION
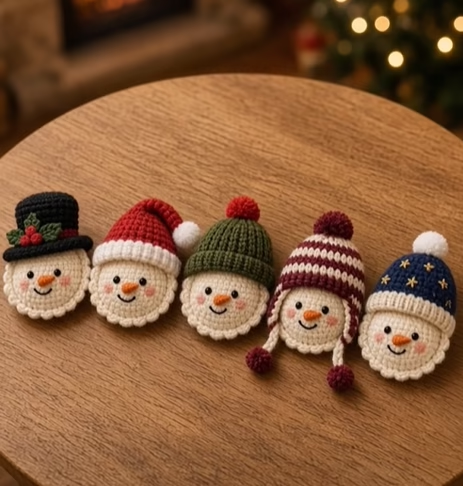
Bring warm winter charm into your home with this versatile Snowman Squad pattern set. Featuring one sweet, universal snowman face base paired with five distinct, personality-packed winter hats, this design allows you to mix and match accessories to create a complete collection of festive decor. Whether you choose the dapper black top hat, the playful earflap trapper, or the classic slouchy Santa cap, each finished motif offers an irresistible handmade touch.
These finished snowmen make incredible holiday ornaments, coaster sets, present toppers, garland motifs, or winter appliqués for blankets and garments. Because each face motif is worked flat with a clean scalloped outer border, they lay flat for functional use while remaining stuffed just enough to give a soft, touchable amigurumi dimension.
The reference design highlights key visual features: a soft cream face base bordered by delicate crochet scallops, bright safety eyes, a tiny textured orange carrot nose, a embroidered stitched smile, and rosy blush cheeks. The real stars of the show are the customized hats—ranging from ribbed beanies with pom-poms to embroidered starry night caps and traditional holly-trimmed top hats.
Personalization options are limitless with this project. Switch up yarn shades to match your holiday theme, turn them into festive fridgemagnets by adding magnetic strips to the back, or loop a ribbon through the top for instant Christmas tree ornaments. Dive into your yarn stash and build your very own snowman squad today!
🔍 C. MAIN PATTERN OVERVIEW
This comprehensive pattern set consists of two main parts: a Universal Snowman Face Base and 5 Distinct Winter Hat Options.
                             [ Snowman Squad Motif Architecture ]
                                              │
                     ┌────────────────────────┴────────────────────────┐
                     ▼                                                 ▼
        ┌─────────────────────────┐                       ┌─────────────────────────┐
        │  Universal Face Base    │                       │  5 Custom Hat Variants  │
        ├─────────────────────────┤                       ├─────────────────────────┤
        │ • Front & Back Discs    │                       │ 1. Classic Top Hat      │
        │ • Scalloped Edging      │                       │ 2. Slouchy Santa Cap    │
        │ • Mini Carrot Nose      │                       │ 3. Green Ribbed Beanie  │
        │ • Embroidered Expression│                       │ 4. Striped Earflap Cap  │
        └─────────────────────────┘                       │ 5. Starry Night Beanie  │
                                                          └─────────────────────────┘
The Face Base uses two double-layered circular discs sandwiched together to provide structure, finished with a decorative 12-shell scalloped border around the lower circumference.
The 5 Hat Components are constructed as follows:
- 🎩 Hat 1: Classic Black Top Hat — A structured black cylinder top hat accented with a red band, two mini holly leaves, and three bright red berries.
- 🎅 Hat 2: Red Slouchy Santa Cap — A classic red stocking cap with a plush folded white brim and a fluffy white pom-pom tip.
- 🌲 Hat 3: Forest Green Ribbed Beanie — A textured fold-over ribbed beanie topped with a bold crimson pom-pom.
- ❄️ Hat 4: Burgundy & Cream Earflap Trapper — A cozy striped trapper hat with side earflaps, mini hanging pom-pom ties, and a crown pom-pom.
- ⭐ Hat 5: Navy Blue Starry Night Beanie — A deep blue beanie accented with gold star embroidery stitches, a cream ribbed brim, and a white pom-pom topper.
🎯 D. SKILL LEVEL
Skill Level: Easy to Intermediate
This pattern is well-suited for adventurous beginners and intermediate crocheters. The base face uses basic single crochet circular rounds, while the hats introduce slightly more advanced techniques such as working in back/front loops only, simple color changes, flat ribbing, and light embroidery.
- 🧶 Techniques Used:
- ⭕ Magic Ring (MR)
- 🧵 Single Crochet (sc), Half Double Crochet (hdc), Double Crochet (dc)
- 📈 Increases (inc) and Decreases (dec)
- 🔄 Working in Back Loops Only (BLO) and Front Loops Only (FLO)
- 🎨 Color changing in continuous and joined rounds
- 🪡 Basic facial embroidery and French knots / star stitches
- 🧶 Mini pom-pom making
📏 E. FINISHED SIZE
When made with DK / Light Worsted (#3) weight yarn and a 2.75 mm crochet hook, each finished snowman motif measures:
- 📐 Width: Approximately 8.5 cm (3.3 inches) across the scalloped face base.
- 📐 Height: 11.5 cm – 13.5 cm (4.5 – 5.3 inches) depending on the selected hat style.
💡 Note: Using worsted weight (#4) yarn with a 3.5 mm hook will yield a larger coaster/applique measuring roughly 11 cm wide by 15 cm tall.
🧮 F. GAUGE
- 📏 Gauge Target: 22 sts and 24 rows in single crochet = 10 cm x 10 cm (4″ x 4″) using a 2.75 mm hook.
- 🎯 Gauge Relevance: Tension is not critical for fit, but stitches must remain tight and firm so fiberfill stuffing does not show through the front face disc.
🧶 G. REQUIRED YARN AMOUNTS
All measurements are based on DK / Light Worsted Cotton or Acrylic Blend Yarn:
| Color | Recommended Shade | Estimated Quantity (for 1 Full Set of 5) |
| 🍦 Off-White / Cream | Soft Ivory | ~85 g / 210 m (230 yds) |
| 🖤 Black | Classic Jet Black | ~15 g / 37 m (40 yds) |
| 🔴 Bright Red | Festive Crimson | ~20 g / 49 m (54 yds) |
| 🍷 Burgundy | Deep Wine | ~15 g / 37 m (40 yds) |
| 🌲 Forest Green | Sage / Pine Green | ~20 g / 49 m (54 yds) |
| 💙 Navy Blue | Deep Midnight Blue | ~15 g / 37 m (40 yds) |
| 📙 Orange | Pumpkin / Carrot | ~5 g / 12 m (13 yds) |
| 🌸 Pink / Yellow | Soft Pink & Gold Thread | Tiny scraps for cheeks & stars |
🧰 H. MATERIALS
- 🪡 Crochet Hook: 2.75 mm (US C-2) or size needed to obtain dense stitches.
- 👁️ Safety Eyes: 6 mm black solid safety eyes (10 pieces total for 5 snowmen) or black embroidery floss.
- ☁️ Stuffing: Premium polyester fiberfill (light stuffing required).
- 🪡 Tapestry Needle: Blunt yarn needle for assembly and facial detailing.
- ✂️ Tools: Sharp yarn scissors, stitch markers, straight pins.
- 🎨 Optional: Pink powdered blush & cotton swab (for shading cheeks), 15 mm fork or mini pom-pom maker.
⚠️ Safety Note: If making these for infants or young children under 3 years old, embroider the eyes with black yarn instead of using plastic safety eyes.
🔤 I. ABBREVIATIONS – US TERMS
- ⭕ MR: Magic Ring
- 🧵 st / sts: Stitch / Stitches
- 🔗 ch: Chain
- 💧 sl st: Slip Stitch
- ➕ sc: Single Crochet
- 📐 hdc: Half Double Crochet
- 📊 dc: Double Crochet
- 📈 inc: Increase (2 sc in same st)
- 📉 dec: Single Crochet Decrease (sc 2 together)
- 🔄 BLO: Back Loop Only
- 🔄 FLO: Front Loop Only
- 🔁 rep: Repeat
- ⭕ rnd / rnds: Round / Rounds
📝 J. NOTES BEFORE YOU BEGIN
- 🔄 Spiral Rounds: The face discs and top hats are worked in continuous spiral rounds without joining unless specified. Do not chain 1 at the start of a round unless noted.
- 📍 Stitch Markers: Place a marker in the first stitch of each round to keep track of your count.
- 🧵 Seamless Color Changes: Change yarn colors on the final yarn-over of the last stitch in the previous color.
- ✂️ Yarn Tails: Leave a generous 20–25 cm (8–10 inch) tail when fastening off components that require sewing.
🪡 K. COMPLETE PATTERN
🧠 MODULE 1: UNIVERSAL SNOWMAN FACE BASE
(Make 2 Discs per Snowman: 1 Front Disc, 1 Back Disc)
                       [ Face Disc Structure - 48 Stitches ]
                                    (0 - 8 Rnds)
                                     . - ~ - .
                                  . '         ' .
                                 /   (MR 6)      \
                                |    R1 -> R8     |
                                 \   48 sts      /
                                  ' .         . '
                                     ' - ~ - '
⚪ Front Face Disc
Using Cream/Off-White Yarn.
- R1: MR 6 sc. (6)
- R2: inc in each st around. (12)
- R3: (1 sc, inc) x6. (18)
- R4: (2 sc, inc) x6. (24)
- R5: (3 sc, inc) x6. (30)
- R6: (4 sc, inc) x6. (36)
- R7: (5 sc, inc) x6. (42)
- R8: (6 sc, inc) x6. (48)
- Fasten off for Front Disc, weave in starting center tail, and attach facial features now (see instructions below).
⚪ Back Face Disc
Repeat R1–R8 as above using Cream/Off-White Yarn. Do not cut yarn on Back Disc.
🥕 Mini Carrot Nose
Using Orange Yarn.
- R1: MR 4 sc. (4)
- R2: (1 sc, inc) x2. (6)
- R3: 6 sc around. (6)
- Fasten off, leaving a sewing tail. Do not stuff.
😃 Face Feature Embroidery & Attachment
- Safety Eyes: Insert 6 mm safety eyes into the Front Disc between R4 and R5, spaced roughly 7 stitches apart.
- Nose Attachment: Position the carrot nose centered between and slightly below the eyes (over R5-R6). Sew flat using the yarn tail.
- Mouth: Embroider a gentle curved smile using black yarn or embroidery thread directly below the nose spanning 3–4 stitches.
- Cheeks: Embroider a short horizontal stitch in pink yarn below each eye, or brush lightly with pink cosmetics blush.
                              [ Facial Alignment Map ]

                                     Eye    Eye
                                    ( R4 ) ( R4 )
                                       \    /
                                    [ Carrot Nose ] (R5-R6)
                                        \  /
                                     [  Smile  ] (R6-R7)
                                   (Pink)   (Pink)
🌸 Joining Discs & Adding Scalloped Border
- Place Front Disc (with facial details attached) and Back Disc wrong-sides together.
- Align stitches of both discs. Continue with working yarn from Back Disc through both loops of both discs to join them together:
- Joining Round: Sc in next 48 sts around both layers, inserting a very thin layer of fiberfill stuffing before closing the last 10 stitches. Sl st to first sc to join. (48)
- Scalloped Border Round:(Worked across the bottom 32 stitches only; top 16 stitches remain smooth where the hat sits):
[skip 1 st, 5 dc in next st, skip 1 st, sl st in next st]rep 8 times along the bottom edge.- Sl st across remaining 16 sts. Fasten off and weave in ends.
🎩 MODULE 2: HAT #1 — CLASSIC BLACK TOP HAT WITH HOLLY
                                  ┌──────────────┐
                                  │   TOP CROWN  │
                                  │  (Black Yarn)│
                                  ├──────────────┤
                          [Red Band]====[Red Band]
                        ┌──────────────────────────┐
                        │        FLAT BRIM         │
                        └──────────────────────────┘
                              🍃 (Holly & Berries)
🖤 Hat Crown & Brim
Using Black Yarn.
- R1: MR 6 sc. (6)
- R2: inc in each st around. (12)
- R3: (1 sc, inc) x6. (18)
- R4: (2 sc, inc) x6. (24)
- R5: (3 sc, inc) x6. (30)
- R6: BLO 30 sc around. (30)
- R7–R11: 30 sc around. (30) (5 rounds total)
- R12 (Red Band): Switch to Bright Red yarn. 30 sc around. (30)
- R13 (Brim): Switch back to Black yarn. Working in FLO: (2 sc, inc) x10. (40)
- R14: (3 sc, inc) x10. (50)
- Sl st to next st, fasten off leaving a long tail for sewing onto the head. Lightly stuff crown.
🍃 Holly Leaves (Make 2)
Using Forest Green Yarn.
- Ch 5. Starting in 2nd ch from hook: sl st, sc, hdc, (sc, ch 2, sl st in 2nd ch from hook, sc) in last ch. Working along opposite side of chain: hdc, sc, sl st.
- Fasten off, leaving a tail for assembly.
🍒 Holly Berries (Make 3)
Using Bright Red Yarn.
- R1: MR 4 sc, sl st to first st to close circle.
- Fasten off leaving a tail. Pull magic ring tight to form a tiny ball.
🎅 MODULE 3: HAT #2 — RED SLOUCHY SANTA STOCKING CAP
                                       (Pom-Pom)
                                          ( )
                                         /   \
                                        / Red \
                                       / Cap   \
                                      /_________\
                                     [White Brim ]
🔴 Stocking Cap Body
Using Bright Red Yarn.
- R1: MR 4 sc. (4)
- R2: (1 sc, inc) x2. (6)
- R3: (2 sc, inc) x2. (8)
- R4: (3 sc, inc) x2. (10)
- R5: (4 sc, inc) x2. (12)
- R6: (3 sc, inc) x3. (15)
- R7: (4 sc, inc) x3. (18)
- R8: (2 sc, inc) x6. (24)
- R9: (3 sc, inc) x6. (30)
- R10: (4 sc, inc) x6. (36)
- R11–R15: 36 sc around. (36) (5 rounds total)
- Sl st to next st, fasten off Red yarn.
⚪ Folded White Brim
Attach White Yarn to R15.
- R16: FLO 36 sc around. (36)
- R17–R19: 36 sc around. (36)
- Fasten off, fold R16–R19 upward to create a folded ribbed brim.
⚪ Mini White Pom-Pom
Using White Yarn.
- Wrap yarn 15 times around two fingers (or a small fork). Tie securely at the center, cut outer loops, and trim down into a dense 1.5 cm mini sphere. Sew to tip of R1.
🌲 MODULE 4: HAT #3 — FOREST GREEN RIBBED FOLD-OVER BEANIE
                                      (Red Pom)
                                         ( )
                                    ┌───────────┐
                                    │  Ribbed   │
                                    │   Green   │
                                    │  Beanie   │
                                    ├───────────┤
                                    [Folded Cuff]
🌿 Ribbed Beanie Base
Worked flat in rows using Forest Green Yarn.
- Row 1: Ch 16. Hdc in 2nd ch from hook and across. (15 hdc)
- Row 2–24: Ch 1, turn. Working in BLO, 15 hdc across. (15 hdc)
- Fasten off, leaving a long 30 cm tail.
🧶 Beanie Assembly
- Seam Cylinder: Fold rectangle in half aligning Row 1 and Row 24. Sl st or sew edges together to form a tube.
- Cinch Top: Thread tail onto tapestry needle and weave through stitch ends along one edge of the tube. Pull tight to cinch the crown top shut. Knot securely.
- Cuff: Turn beanie right-side out and fold bottom 4 rows upward to form a thick folded cuff.
- Pom-Pom: Create a bright red 2 cm pom-pom and attach securely to top cinched crown.
❄️ MODULE 5: HAT #4 — BURGUNDY & CREAM STRIPED EARFLAP TRAPPER
                                    (Burgundy Pom)
                                         ( )
                                    ┌───────────┐
                                    │ Striped   │
                                    │ Trapper   │
                                   /└───────────┘\
                                  (Ear)         (Ear)
                                    |             |
                                  (Pom)         (Pom)
🍷 Trapper Hat Crown
Start with Burgundy Yarn (Color A). Cream Yarn (Color B).
- R1 (Color A): MR 6 sc. (6)
- R2 (Color A): inc in each st around. (12)
- R3 (Color B): (1 sc, inc) x6. (18)
- R4 (Color B): (2 sc, inc) x6. (24)
- R5 (Color A): (3 sc, inc) x6. (30)
- R6 (Color A): (4 sc, inc) x6. (36)
- R7–R8 (Color B): 36 sc around. (36)
- R9–R10 (Color A): 36 sc around. (36)
- R11–R12 (Color B): 36 sc around. (36)
- Fasten off Color B. Keep Color A attached.
👂 Earflaps (Make 2 on opposite sides)
Worked in rows across 7 stitches along edge of R12 using Burgundy (Color A).
- Row 1: 7 sc, ch 1, turn. (7)
- Row 2: dec, 3 sc, dec, ch 1, turn. (5)
- Row 3: 5 sc, ch 1, turn. (5)
- Row 4: dec, 1 sc, dec, ch 1, turn. (3)
- Row 5: dec3 (sc 3 together). (1)
- Fasten off. Skip 11 sts along front brim, reattach yarn and repeat Rows 1–5 for second earflap.
🧵 Ties & Pom-Poms
- Attach 3 strands of Burgundy & Cream yarn (20 cm long) to the tip of each earflap.
- Braid strands, knot bottom, and trim into a mini pom-pom tassel.
- Attach a 2 cm Burgundy pom-pom to top of crown.
⭐ MODULE 6: HAT #5 — NAVY BLUE STARRY NIGHT BEANIE
                                      (White Pom)
                                          ( )
                                     ┌───────────┐
                                     │ Navy Blue │
                                     │  *  *  *  │ (Gold Stars)
                                     ├───────────┤
                                     [Cream Cuff ]
💙 Beanie Crown
Using Navy Blue Yarn.
- R1: MR 6 sc. (6)
- R2: inc in each st around. (12)
- R3: (1 sc, inc) x6. (18)
- R4: (2 sc, inc) x6. (24)
- R5: (3 sc, inc) x6. (30)
- R6: (4 sc, inc) x6. (36)
- R7–R12: 36 sc around. (36) (6 rounds total)
- Sl st to next st, fasten off Navy yarn.
🍦 Cream Ribbed Cuff
Attach Cream Yarn to FLO of R12.
- R13: FLO (5 sc, inc) x6. (42)
- R14–R16: 42 sc around. (42)
- Fasten off and fold cuff upward over Navy body.
⭐ Star Embroidery Details
Using Gold / Yellow Embroidery Thread or Yarn.
- Using a tapestry needle, embroider 6–8 small 5-point stars across the Navy portion of the beanie.
- Stitch technique: Make a small vertical ‘X’ stitch, then add a horizontal tick across the center to form a starburst.
🎨 L. STYLING / ASSEMBLY / STABILITY / FINAL SHAPING
                             [ Final Assembly Diagram ]

                                   [ Selected Hat ]
                                          │
                                 (Sew along R15-R16)
                                          │
                                  ┌───────────────┐
                                  │   Snowman     │
                                  │   Face Disc   │
                                  └───────────────┘
                                          │
                                  [Scalloped Base]
🪡 Head-to-Hat Assembly Procedure
- Position chosen hat angled slightly forward onto top smooth edge of snowman face disc.
- Pin hat securely in place so it covers the top 14–16 stitches of the face disc.
- Using long yarn tail from hat brim, stitch hat down through both layers of face disc using neat mattress stitches.
- Ensure stuffing inside hat and face disc is evenly distributed before closing seam.
📍 Display & Stability Options
- 🎄 Tree Ornament: Thread 20 cm of gold twine through top crown of hat and knot inside.
- 🥛 Coaster Use: Ensure back disc remains flat by blocking lightly with a damp cloth before attaching hats.
- 🧲 Refrigerator Magnet: Glue a 25 mm flat ceramic magnet to back disc using heavy-duty craft adhesive.
🔄 Recommended Assembly Sequence
1. Crochet Front & Back Face Discs ──► 2. Attach Eyes, Nose & Stitch Smile
                                                    │
4. Crochet Selected Hat Variant    ◄── 3. Join Discs & Add Scalloped Border
        │
        ▼
5. Stitch Hat to Head Disc         ──► 6. Add Top Pom-Poms, Holly, or Star Embroidery
✅ Final Shaping & Finishing Checklist
- ✅ Facial features are centered and horizontally aligned with carrot nose.
- ✅ Scalloped lower border fans out smoothly around bottom curve.
- ✅ Hat is securely stitched and does not flop backward.
- ✅ Pom-poms are tightly trimmed and firmly attached.
- ✅ All yarn tails are woven inside layers and trimmed clean.
💡 M. HELPFUL CROCHET TIPS
- 💡 Maintain Tight Tension: Amigurumi requires dense stitches so fiberfill remains hidden. If stitches look gappy, downsize your hook to 2.5 mm.
- 💡 Prevent Oval Distortions: Stagger your increase placement on round 6 and 8 of face disc to achieve a perfect circle instead of a hexagon.
- 💡 Fluff-Free Fiberfill: Tear fiberfill into small tufts before stuffing rather than inserting one dense clump for a smoother surface.
- 💡 Neat Scallop Edging: Ensure slip stitches in scalloped border are pulled snug to make shells pop crisply.
- 💡 Perfect Pom-Poms: Wrap yarn tightly around fork tines and tie with dental floss or strong nylon thread to prevent shedding over time.
- 💡 Blush Layering: Apply real powder blush lightly with a cotton swab; build color slowly to avoid harsh pink spots.
- 💡 Clean Color Swaps: Always execute last yarn-over of previous stitch with new color to avoid color-bleed ticks on hats.
- 💡 Seamless Seams: Use mattress stitch when sewing hat brims to face base for an invisible join.
🧼 N. CARE INSTRUCTIONS
- 🧼 Cleaning: Hand wash gently in cool water using mild detergent. Do not wring or twist.
- 🧻 Drying: Press gently between clean towels to remove excess water; reshape and lay flat on a drying rack away from direct heat.
- 📦 Storage: Store flat in a breathable cotton bag. Avoid placing heavy items on top to preserve pom-pom fluff and shape.
❓ R. FAQ
❓ Can I use Worsted Weight (#4) yarn instead of DK weight?
Yes! Using worsted weight yarn with a 3.5 mm hook will increase finished size to roughly 11 cm x 15 cm, making them ideal as decorative mug rugs or larger wall hangings.
❓ How do I make these completely child-safe?
Replace 6 mm plastic safety eyes with embroidered black French knots and ensure pom-poms are sewn on with double-reinforced knots.
❓ Can I turn these into a holiday garland?
Absolutely! Crochet a long chain (approx. 150 cm) in cream or red yarn, then sl st to back top of each completed snowman hat every 15 cm.
❓ Why is my face disc curling into a bowl shape?
Curling usually means stitch tension is too tight or increase count was missed. Double-check that each round increases by exactly 6 stitches.
❓ How do I stop pom-poms from coming apart?
Tie center knot of pom-poms using strong nylon upholstery thread or dental floss instead of standard acrylic yarn.